- Windows
- 19 November 2014 at 12:42 UTC
-


In some cases, you need to export the private key of a ".pfx" certificate in a ".pvk" file and the certificate in a ".cer" file.
For example :
To generate certificates with makecert but by using your certification authority created on Windows Server.
Knowing that Windows Server offers only export formats ".pfx" and ".cer" for this authority certificate, you must follow this tutorial to use this authority with makecert.
Prerequisites :
- OpenSSL 1.x
Note: this tutorial still works with OpenSSL 3.6.1 (available in 2026).
- OpenSSL Installation
- Export the private key (.pvk) from the certificate (.pfx)
- Exporting the ".cer" certificate from the ".pfx" certificate
- Preview of obtained files
1. OpenSSL Installation
To begin, download "OpenSSL", unzip the downloaded zip file and navigate to the "bin" folder.
To avoid OpenSSL say you "WARNING: can't open config file: C:/OpenSSL/openssl.cnf", copy the contents of the "bin" folder in the "C:\OpenSSL" folder (that you must create) .
2. Export the private key (.pvk) from the certificate (.pfx)
To begin, start a command prompt (cmd) and type this :
Batch
cd C:\OpenSSL
Then, export the private key of the ".pfx" certificate to a ".pem" file like this :
Batch
openssl pkcs12 -in cert.pfx -nocerts -nodes -out key.pem
OpenSSL will ask you for the password that protects the private key included in the ".pfx" certificate.
If the password is correct, OpenSSL display "MAC verified OK".
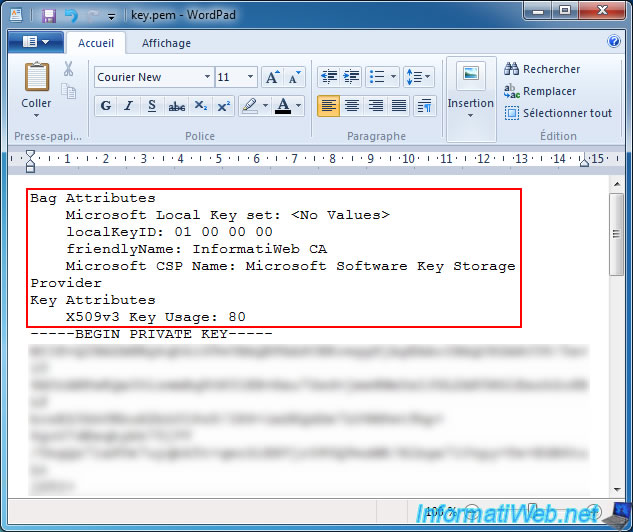
Then, open the "key.pem" file with WordPad (included with Windows) or Notepad++, delete lines that are above the line "-----BEGIN PRIVATE KEY-----" and save this file under the same name.
Your file will should look like this :
Plain Text
-----BEGIN PRIVATE KEY-----
Several lines of letters and numbers
-----END PRIVATE KEY-----
Note : DON'T use the Windows's notepad, because line returns of this file will not be recognized by this program.
Finally, convert the private key from the ".pem" format to the ".pvk" format.
Batch
openssl rsa -in key.pem -outform PVK -pvk-strong -out key.pvk
OpenSSL will ask you, yet again, the password that protects the private key.
3. Exporting the ".cer" certificate from the ".pfx" certificate
To begin, convert the certificate from the ".pfx" format to the ".pem" format, by typing this :
Batch
openssl pkcs12 -in cert.pfx -nokeys -nodes -out cert.pem
Attention : comme pour le fichier de clé privée, vous devrez supprimer les lignes qui se trouvent avant chaque bloc "BEGIN CERTIFICATE" si vous souhaitez utiliser le fichier PEM créé par OpenSSL.
Pour cela, utilisez à nouveau Wordpad ou Notepad++.
OpenSSL will ask you for the password that protects the ".pfx" certificate.
If the password is correct, OpenSSL display "MAC verified OK".
Then, convert this certificate from the ".pem" format to the ".cer" format, by typing this :
Batch
openssl x509 -inform PEM -in cert.pem -outform DER -out cert.cer
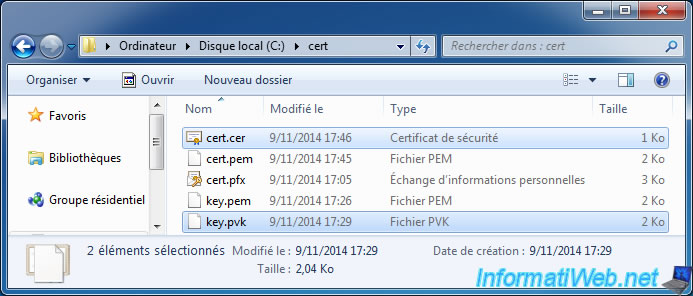
4. Preview of obtained files
With these commands, you have your key in the ".pvk" format and your certificate in the ".cer" format (DER encoded).
Share this tutorial
To see also
-

Windows 7/29/2013
Knowing your hardware
-
Windows 9/19/2022
Windows - Install Windows in UEFI mode (GPT)
-

Windows 4/2/2022
Windows 8 - Change the network profile used
-

Windows 7/23/2014
Windows XP - Partitioning your hard drive
You must be logged in to post a comment