- Windows
- 03 December 2014 at 13:29 UTC
-


Prerequisites :
- This : Microsoft Windows SDK for Windows 7 and .NET Framework 4 (Web installer / ISOs)
- Or this : Visual Studio (paid versions because the Express version does not contain the "makecert" program)
Tutorial tested with :
- "Microsoft Windows SDK for Windows 7 ..." (free)
- "Microsoft Visual Studio 2010 Ultimate" (paid but available in trial version)
- Create your program
- Start a command prompt Win SDK or Visual Studio 2010
- Creating a certification authority
- Add the certificate of our certification authority in the list of trusted authorities in the system
- Generate a certificate signed by our CA
- Creating the certificate in the "SPC" format (Software Publisher's Certificate)
- Creating the certificate in the PFX format from the ".spc" certificate and the ".pvk" private key
- Signing the program using the certificate in PFX format
- Verification and previews
1. Create your program
In our case, we created a test program with the programming language "VB .Net" that we usually use for : Our programs.
This is the program that we sign in this tutorial.
2. Start a command prompt Win SDK or Visual Studio 2010
If you choose to install "Microsoft Windows SDK ...", just leave the default options.
Then, go to "Start Menu -> Microsoft Windows SDK 7.1" and click on "Windows SDK 7.1 Command Prompt".
If you choose to install Visual Studio (in paid version), go to "Start Menu -> Microsoft Visual Studio 2010 -> Visual Studio Tools" and click on "Command Prompt Visual Studio (2010)."
3. Creating a certification authority
To create certificates (the authority + certificates issued by our authority), we use the "makecert" program.
For convenience, create a "cert" folder on your hard drive and move to this folder by typing :
cd d:\ cert
Note : In our case, we created a "cert" folder on the partition "D".
To create a certification authority, you have 2 options :
- Either you have a server running Windows Server and you want to install your CA on this server.
And then use the CA to generate your certificates (which you will generate using makecert).
To do this, follow our tutorial : Windows Server 2012 / 2012 R2 - Create an Enterprise Root Certificate Authority (Root CA).
- Either you want to create a Certification Authority in Windows using the makecert program.
To create a certification authority using makecert, type this in the command prompt :
Batch
makecert -n "CN=InformatiWeb CA" -cy authority -a sha1 -sv "InformatiWeb_CA.pvk" -r "InformatiWeb_CA.cer"
Notes :
- makecert asked to create a password for the private key and then enter it.
- In our case, our authority will have the name "InformatiWeb CA" (CA stands for : Certification Authority).
- If all goes well, the word "Succeeded" will be displayed in the command prompt.
Explanations :
-n : Specifies the name of the certification authority that you create.
-cy : Specifies the type of certificate. In this case : Certification Authority.
-a : Specifies the signature algorithm. In this case : sha1
sv : Specifies the private key file. In this case, it will be created and the private key will be saved in a ".pvk" file.
-r : Creates a self-signed certificate. This option will create a root authority certificate (our authority not dependent on any known authority).
"Certificate name.cer" : Name of the certificate in the ".cer" format, in which the X.509 certificate of the certification authority will be written.
4. Add the certificate of our certification authority in the list of trusted authorities in the system
For your certificates are considered valid, you must import the certificate of your certification authority in the list of "Thrusted Root Certification Authorities" of your computers.
To do this, refer to our tutorial : Import a certificate (of a root certification authority) in the trusted certificates list of Windows.
5. Generate a certificate signed by our CA
If you want to sign your certificate with your certification authority created under Windows Server, you must :
- Export the certificate of your authority, in pfx format : Exporting the root authority certificate authority
- Extract the ".cer" certificate and the ".pvk" private key from the ".pfx" certificate, by following this : OpenSSL - Convert a .pfx certificate to a .pvk private key and a .cer certificate
Now that our authority is recognized as a trusted authority (only on computers which you imported the root certificate in the system trusted authorities), we will generate a certificate that will be issued (signed) by our authority.
To do this, type this command :
Batch
makecert -n "CN=InformatiWeb Dev Team" -ic "InformatiWeb_CA.cer" -iv "InformatiWeb_CA.pvk" -a sha1 -sky exchange -pe -sv "InformatiWebDevTeam.pvk" "InformatiWebDevTeam.cer"
After typing this command, makecert ask you to create the password of the private key of the certificate to generate (Subject Key) and then enter it.
Once the passwords are indicated , makecert will ask you the password of the private key of the certification authority (Issuer Signature)
Note : If all goes well, the word "Succeeded" will be displayed in the command prompt.
Explanations :
-n : Specifies the name of our company (this name will appear as the verified publisher when you run your program as administrator)
-ic : Specifies the issuer's certificate file (the emitter being the certification authority)
-iv : Specifies the .pvk private key file of the issuer (or certification authority).
-a : Specifies the signature algorithm. In this case : sha1
-sky : Specifies the key type of the subject. In this case : exchange (which indicates that the key is used for the key encryption and key exchange)
-pe : Marks the generated private key as exportable. This allows the inclusion of the private key in the certificate.
-sv : Specifies the .pvk private key file of the subject. In this case, it will be created and the private key will be saved in a .pvk file.
"Certificate name.cer" : Name of the .cer file where the X.509 certificate will be written.
6. Creating the certificate in the "SPC" format (Software Publisher's Certificate)
To create the ".spc" certificate, we will use the "cert2spc" program like this :
Batch
cert2spc InformatiWebDevTeam.cer InformatiWebDevTeam.spc
If all goes well, the word "Succeeded" will be displayed in the command prompt.
7. Creating the certificate in the PFX format from the ".spc" certificate and the ".pvk" private key
Because we will need a certificate in the format "pxf", we will generate this .pfx certificate using the "pvk2pfx" program :
Batch
pvk2pfx -pvk "InformatiWebDevTeam.pvk" -spc "InformatiWebDevTeam.spc" -pfx "InformatiWebDevTeam.pfx" -pi pass
Explanations :
-pvk : Specifies the .pvk private key file of the subject.
-spc : Specifies the .spc certificate that contains the .cer certificate.
-pfx : Name of the ".pfx" file, in which the certificate will be created.
-pi : Specifies the password of the private key (.pvk)
Note : -po specifies the password for the .pfx file. If this parameter isn't specified, the password used for the .pfx certificate will be the one specified using the "pi" parameter.
8. Signing the program using the certificate in PFX format
To sign our program, we will use the "signtool" program like this :
Batch
signtool sign /f "InformatiWebDevTeam.pfx" /p pass "test_app.exe"
If all goes well, this message will appear in the command prompt :
Done Adding Additional Store
Successfully signed: le fichier.exe
Explanations :
sign : Digitally signs the file. Digital signatures protect the file against falsification and allow users to verify the signer according to a certificate signing.
/f : Specifies the signing certificate (in .pfx format)
"Certificate name.pfx" : Certificate to use to sign the file.
/p : Specifies the password to use when opening the file PFX.
"the file.exe" : File to digitally sign.
9. Verification and previews
Now that your program is digitally signed, a "Digital Signatures" tab has been added in your file properties.
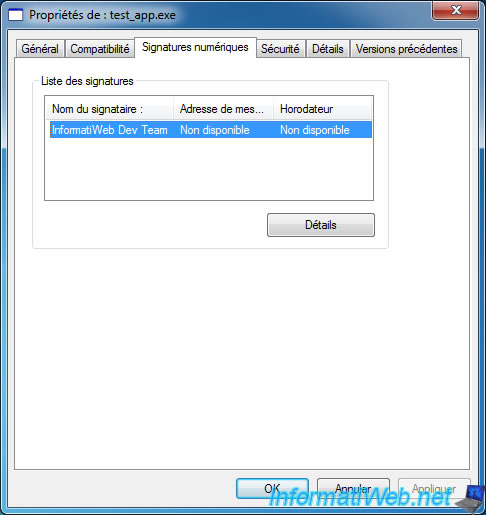
In the details of the digital signature, you will see the name (InformatiWeb Dev Team in our case) and the line "This digital signature is valid".
If this isn't the case, make sure that :
- You have imported the certificate of your authority in the list of trusted authorities in the system
- You have created your certificate with the certificate of your authority
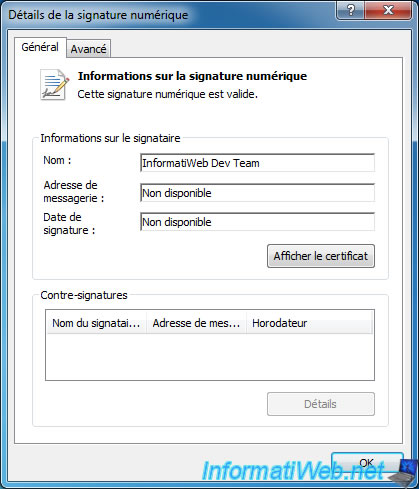
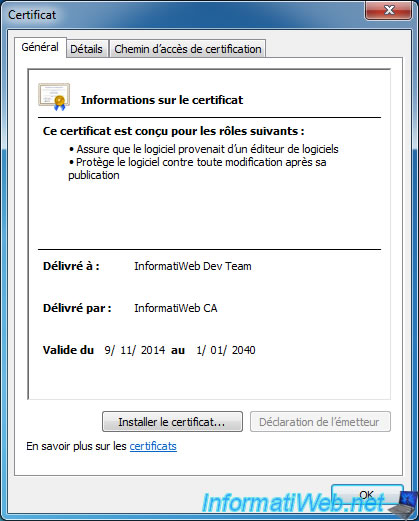
By clicking on "View Certificate", you will see the certificate itself.
You will see that the certificate was issued by your CA and is designed for the following roles :
- Ensures that the software came from a software publisher
- Protects the software against changes after its publication
Indeed, if a hacker trying to hack your program distributed as a trial version, the digital signature will be invalid.
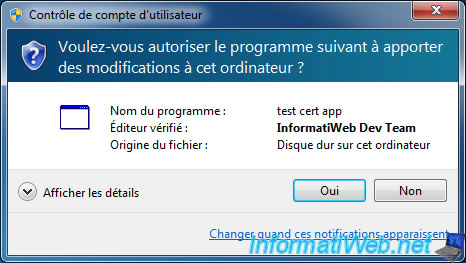
Final difference : when you launch your program as an administrator, the Windows UAC will show the line "Verified Publisher : InformatiWeb Dev Team" with a blue headband instead of orange.
Share this tutorial
To see also
-

Windows 8/12/2019
Control a computer remotely (Win XP)
-

Windows 11/19/2014
OpenSSL - Convert a .pfx certificate to a private key and a certificate
-

Windows 5/15/2023
Windows 11 - Put the start menu on the left
-

Windows 11/10/2013
Windows Vista / 7 / 8 - Repair Windows installation by the upgrade process
You must be logged in to post a comment