- Windows
- Windows 7, Windows 8 / 8.1, Windows Vista, Windows 10, Windows 11
- 29 July 2014 at 10:03 UTC
-

Partitioning a hard drive is important because it allows you to separate your data into several parts. Generally, you create at least two partitions on a hard disk.
The first partition for the operating system or OS (Windows Vista / 7 / 8 / 8.1 / 10 / 11, in this case) and the second partition for your personal data.
The fact to partition your hard drive in this way will you be able to format the first partition to reinstall the operating system after a crash too high of this operating system.
Before formatting the partition, you will copy the important data on the second partition and then you will format the first partition to reinstall the operating system by the installation CD/DVD
In this tutorial, we'll show you how to partition your hard drive on Windows Vista, Windows 7, Windows 8 / 8.1, Windows 10 and Windows 11.
Info : this tutorial lets you know how to partition a hard drive in Windows Vista, Windows 7, Windows 8, ... If you want to understand how this works, refer to our article "Why and how to partition a hard drive?" who will explain the theory of partitioning.
- Initialization
- Create a single partition on the entire hard drive
- Create multiple partitions (for a Multiboot or normal use)
1. Initialization
To begin, many people are asking : "Why my new hard drive is not recognized by Windows ?".
The answer to this question is simple : The disk is not initialized. So there is no partition table or partitions. Because the workstation (or computer) only displays the partitions on your hard drives, it does not show these partitions (since there are no partitions).
Note: This problem does not happen with external hard drives because they are already initialized, partitioned (one partition on any hard drive) and format (usually NTFS).
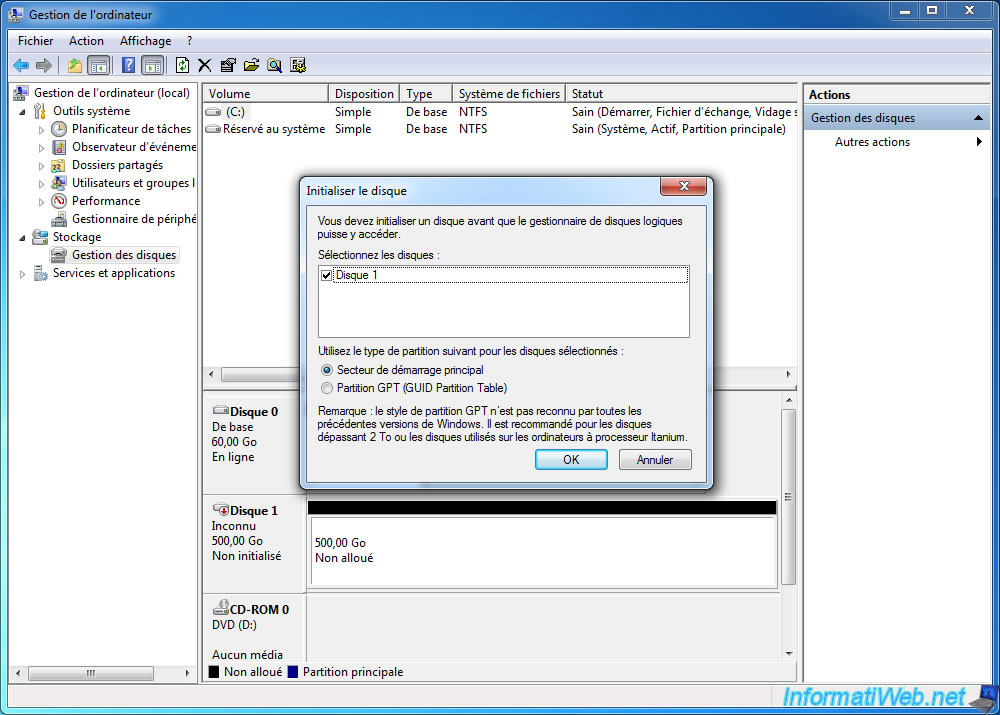
To initialize the hard drive, go to the start menu and right click on "My Computer" (or "Computer" or "This PC" depending on your version of Windows) -> Manage.
On Windows 11, you will need to click on : Show more options -> Manage.
Then, in the "Computer Management" window that appears, go to "Storage -> Disk Management" (in the left).
As you can see, your hard drive is "Not Initialized" and space is "Unallocated" (not partitioned).
Windows will detect that your hard disk is not initialized and this window will appear automatically.
Generally, you can leave these default settings and click OK. GPT system allows you to create partitions larger than 2TB and it's designed for hard drives of more than 2 TB.
2. Create a single partition on the entire hard drive
As indicated at the beginning of this tutorial, partitioning allows to separate your data and generally separate the OS and data.
However, some people have difficulty to partition their hard drive. The easiest way is to create a single partition on the hard drive to use it. It's this type of partitioning is used for external hard drives.
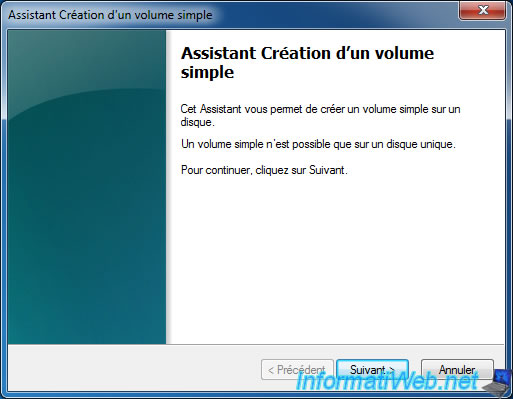
To create a single partition on a hard drive, nothing more simple. Right-click on the unallocated disk space and click "New simple volume".
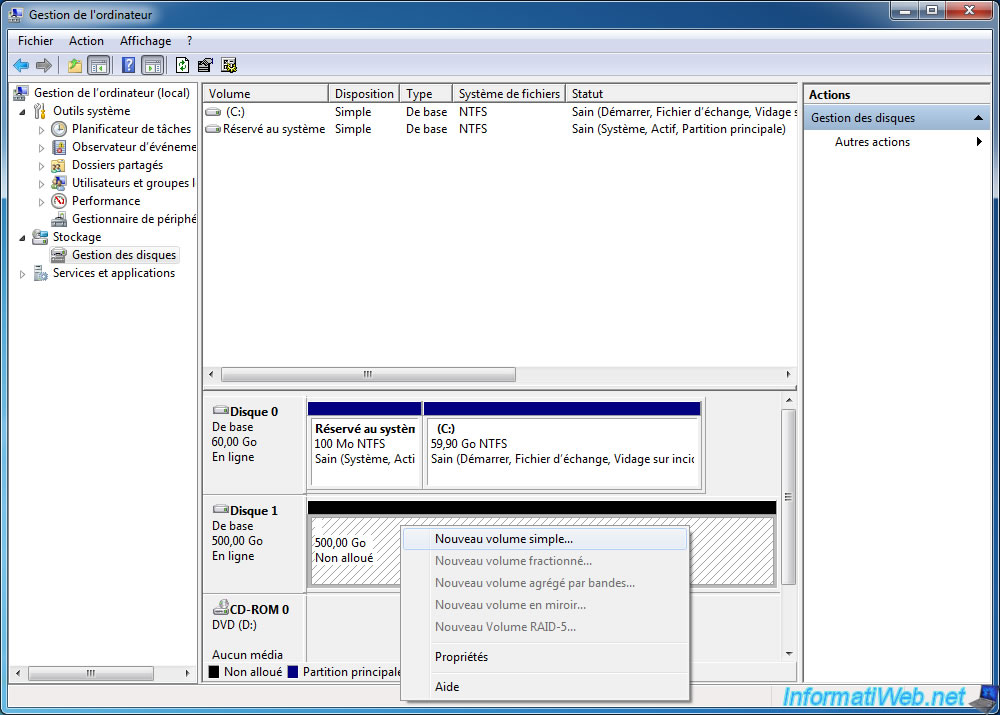
The "New Simple Volume" window is displayed.
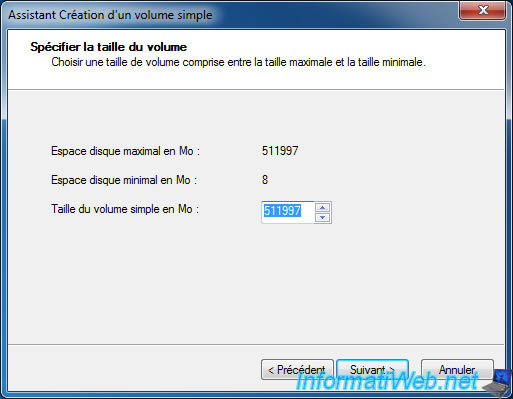
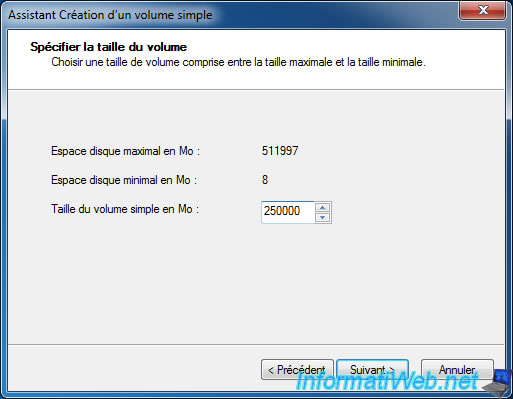
Leave the default size indicated that this partition is created on the entire disk.
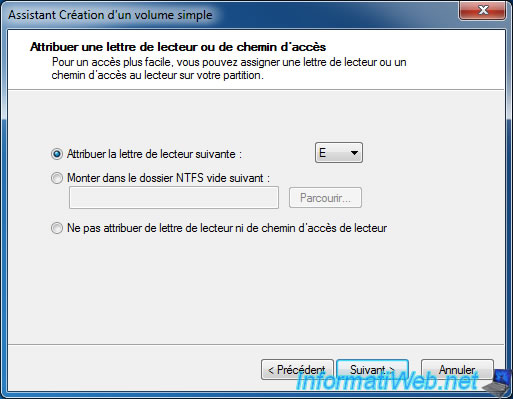
Leave the default selected letter.
Note : The wizard automatically selects the first free letter.
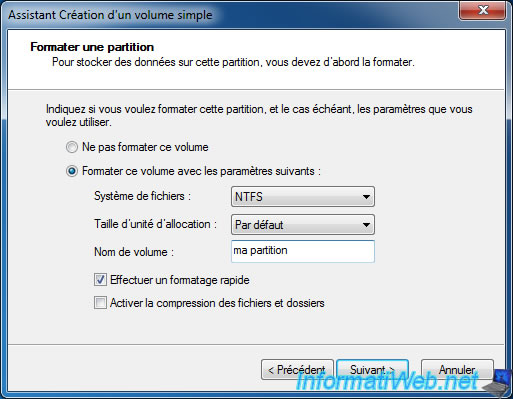
The "file system" the most used are NTFS and FAT32.
NTFS can store large files and manage NTFS permissions unlike FAT32 which does not allow it.
However, FAT32 is more compatible with different existing operating systems (Windows, Linux, Mac, ...).
The easiest way is to enter a name for your partition and check the "Quick Format" box.
Warning : Don't check the "Enable file and folder compression" box because your computer will run slower when you access files that Windows has compressed.
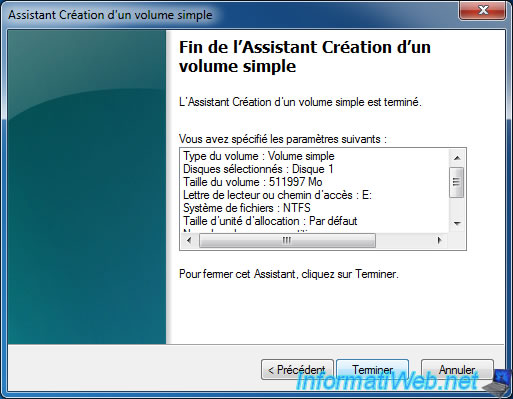
The wizard displays a summary of your settings.
Click "Finish" to create and format the simple volume.
The message "Formatting" is displayed for a while (depending on the performance of your computer and the size of the partition).
When formatting is complete, this message will disappear from the box and the name of your partition will be displayed.
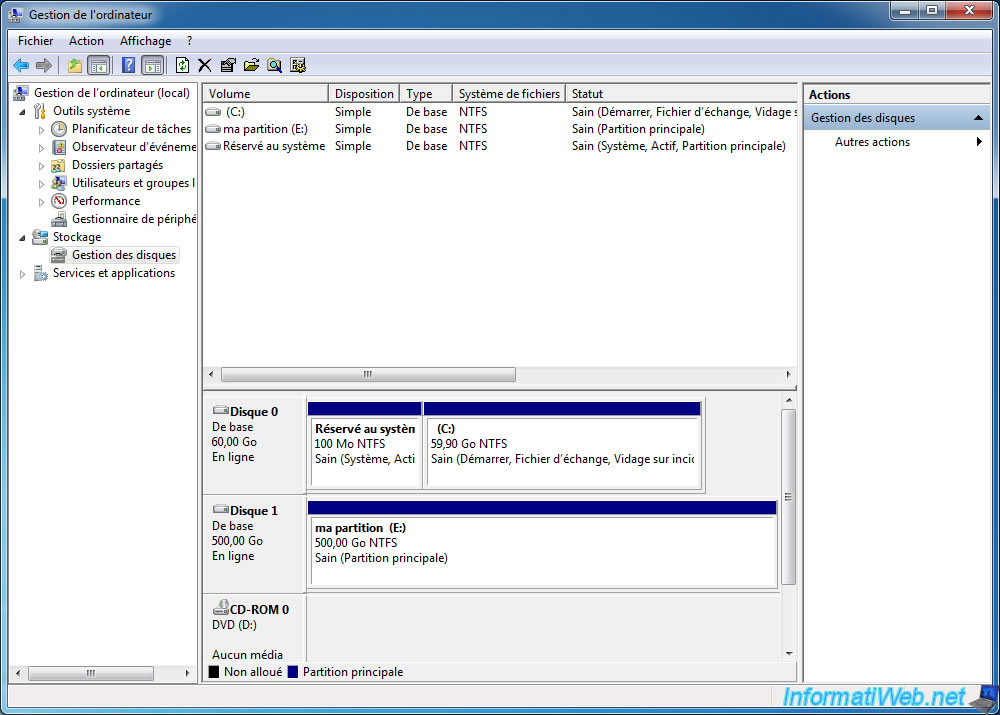
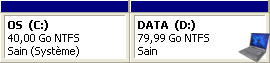
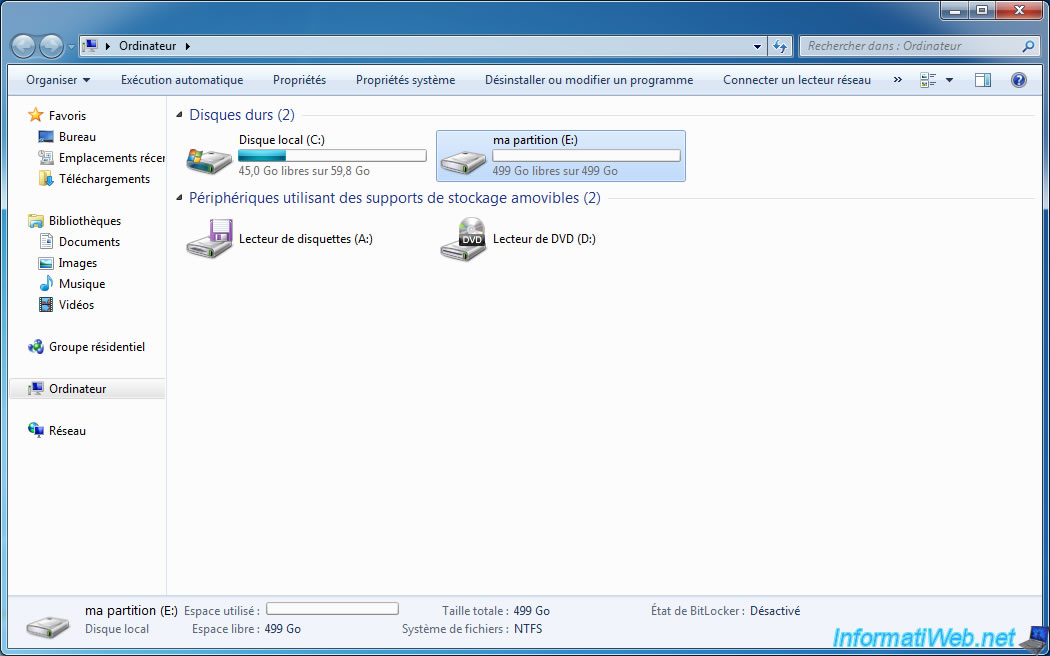
When you go to the workstation, your partition will be displayed.
3. Create multiple partitions (for a Multiboot or normal use)
Now we will explain how to partition your hard drive correctly. That is creating primary partitions and extended partitions if needed.
Firstly, there are two types of partitions :
- the main partitions : to install an operating system partition or to store data.
- the extended partitions : that contain logical drives. These logical disks used to store data (and in rare cases, to install an OS per logical disk).
On a hard disk, you can only create 4 partitions. By against, extended partitions you can create more than 4 partitions.
Notes :
- since Windows Vista, it's no longer possible to choose the partition type (primary or extended). The first 3 partitions will therefore primary partitions and others will be logical drives in an extended partition created automatically by Windows.
- if you want to choose the partition type, you have to go through a partitioning program like GParted (Free Live CD) or Acronis Disk Director (paid software).
More information in our article : "Why and how to partition a hard drive?".
Because Windows no longer allows choose the type of partition, creating multiple partitions is much simpler than before. To create multiple partitions (simples volumes), refer to the previous point but indicate a smaller size than the default size to be able to create multiple volumes.
In our case, we will indicate a smaller size than the size indicated in order to create other simple volumes.
As you can see, Windows starts by creating primary partitions.

Continue to create simple volumes on our hard drive and try to exceed the limit of 4 partitions per disk drive.
As you can see, our first 3 simple volumes are primary partitions and other simple volumes have become logical drives in an extended partition that Windows automatically created.
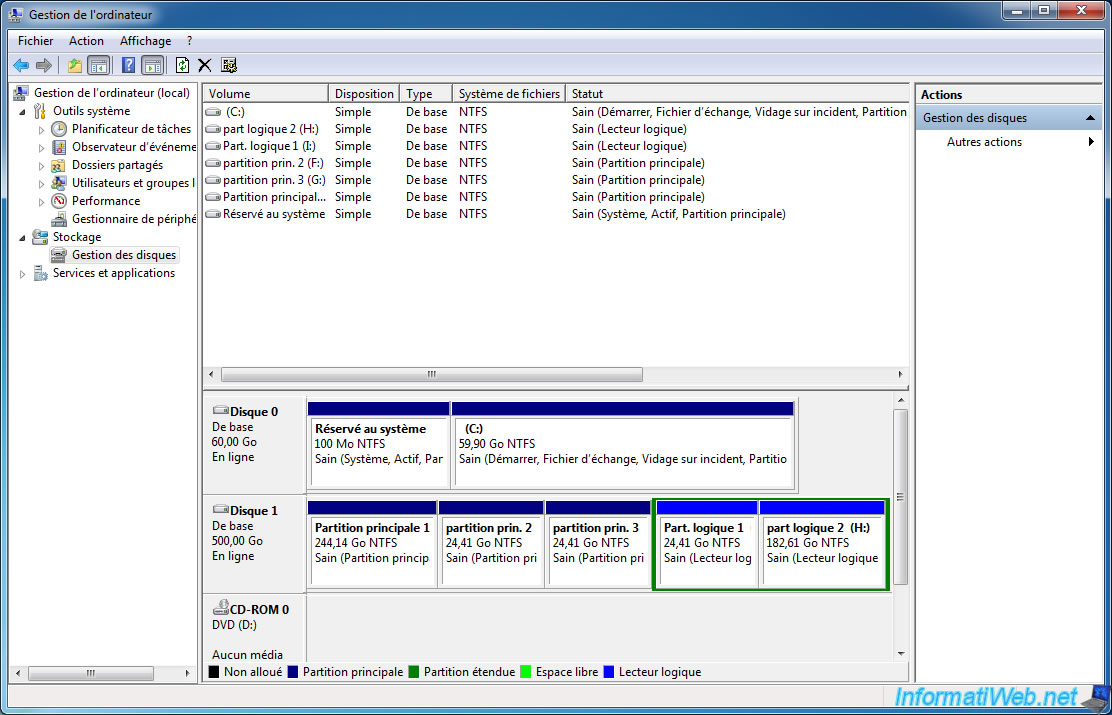
If you go to the desktop (or computer), you will see that the primary partitions and logical drives are displayed in the same way.
To store your data, this system is no problem of compatibility. By against, if you decide to create a multi-boot, you will see that the use of primary partitions is recommended.

Share this tutorial
To see also
-
Windows 2/12/2021
Windows - Test your RAM easily
-
Windows 7/10/2023
Windows 10 - Connect to a Wifi network
-
Windows 5/22/2025
Windows 11 / 10 / 8.1 / 8 / 7 - Add a mirror disk to a software RAID 1
-
Windows 12/19/2020
Windows 7 - Installation on an USB support
You must be logged in to post a comment