- Windows
- Windows 8 / 8.1, Windows 7, Windows 10, Windows 11
- 09 August 2022 at 10:56 UTC
-

- 1/2
On Windows 11, 10, 8.1, 8 and 7, there is a hidden feature called "Hosted Wireless Network" (or "Virtual Wifi") which allows you to create a Wifi network using any compatible Wifi network adapter (even if it's an USB Wifi key).
Info : this tutorial was made on Windows 10 v2004, but has also been tested on Windows 11, 8.1, 8 and 7.
- Check compatibility with your WiFi (wireless) network adapter
- Create the hosted wireless (Wifi) network
- Start the wireless (Wifi) hosted network
- Stop the wireless (Wifi) hosted network
- Automatically start the wireless (Wifi) hosted network when the computer starts up
- Enable Internet Connection Sharing (ICS)
- Connection to the wireless (Wifi) hosted network
- How Internet Connection Sharing (ICS) works
1. Check compatibility with your WiFi (wireless) network adapter
To check if the driver of your Wifi network adapter is compatible with this feature, open a command prompt (cmd.exe) as administrator and use the following command :
Batch
netsh wlan show drivers
This command will show you informations about the Wifi drivers installed on your computer :
Plain Text
Driver                         : Realtek RTL8192CU Wireless LAN 802.11n USB 2.0 Network Adapter
Provider                       : Realtek Semiconductor Corp.
...
Radio types supported          : 802.11n 802.11b 802.11g
...
Hosted network supported       : Yes
...
In the displayed results, locate this line :
Plain Text
Hosted network supported : Yes
If the value is "Yes", your WiFi network adapter supports this feature allowing you to create a WiFi network hosted on your computer.
Otherwise, you will have to try with a different WiFi network adapter.
2. Create the hosted wireless (Wifi) network
To create the wireless (Wifi) network hosted on your computer, use this command.
- set hostednetwork : allows you to configure the "Wireless (Wifi) hosted network" feature.
- mode=allow : allows you to enable the "hosted wireless (Wifi) network" feature.
- ssid="InformatiWeb-Wifi" : set the name of the Wifi network to "InformatiWeb-Wifi".
- key="pass1234" : allows you to protect your WiFi network with a password (ex : pass1234) to prevent anyone from connecting to it.
Batch
netsh wlan set hostednetwork mode=allow ssid="InformatiWeb-Wifi" key="pass1234"
If your network card supports this feature, this will be displayed :
Plain Text
The hosted network mode has been set to allow.
The SSID of the hosted network has been successfully changed.
The user key passphrase of the hosted network has been successfully changed.
Warning : if you have just installed the driver for your wireless (Wifi) network adapter, a restart may be necessary for this command to work in your case.
If your computer doesn't have a wireless (Wifi) network card or its driver is not installed, this will be displayed :
Plain Text
The Wireless AutoConfig Service (wlansvc) is not running.
3. Start the wireless (Wifi) hosted network
For the moment, we have only configured the settings of the hosted wireless network (Wifi).
However, in order for it to be visible to other devices (computers, smartphones, game consoles, tablets, ...), you must first start the associated service.
To do this, in the command prompt as administrator, type this :
Batch
netsh wlan start hostednetwork
This message will appear :
Plain Text
The hosted network started.
Once the hosted wireless (Wifi) network has been started, you can display informations about it using the command :
Batch
netsh wlan show hostednetwork
With this command, you will be able to see :
- the mode : Allowed = enabled.
- the name (SSID) of the Wifi network hosted by your Windows computer.
- the maximum number of clients that can connect to your WiFi network.
- the type of authentication and encryption used. In this case : WPA2 - Personal / CCMP.
- if the hosted network is started (visible and therefore usable by other devices).
- the BSSID of the WiFi network = the MAC address of this hosted WiFi network = the MAC address of your physical WiFi network adapter used by Windows to provide this WiFi network.
- the type of radio = the Wifi standard used. In this case : 802.11n.
- the channel used. This notion of channel is used to avoid interference with the various WiFi networks created by your neighbors.
- the number of clients currently connected to your hosted wireless (Wifi) network.
- the list of connected clients (when there are any).
Plain Text
Hosted network settings
-----------------------
    Mode                   : Allowed
    SSID name              : « InformatiWeb-Wifi »
    Max number of clients  : 100
    Authentication         : WPA2-Personal
    Cipher                 : CCMP

Hosted network status
---------------------
    Status                 : Started
    BSSID                  : a0:f3:c1:XX:XX:XX
    Radio type             : 802.11n
    Channel                : 10
    Number of clients      : 0
WARNING : this wireless (Wifi) hosted network stops when Windows is shut down and doesn't restart automatically.
Its configuration is obviously not lost, but you will have to restart it manually each time you want to make your wireless (Wifi) hosted network available.
You can also create a shortcut and a scheduled task in Windows to start it automatically every time you start Windows.
4. Stop the wireless (Wifi) hosted network
If you want to manually shut down the hosted wireless (Wifi) network, you need to use this command :
Batch
netsh wlan stop hostednetwork
5. Automatically start the wireless (Wifi) hosted network when the computer starts up
As previously indicated, this wireless (WiFi) hosted network automatically shuts down when Windows shuts down and doesn't automatically start when the computer starts up.
However, you only need to create a scheduled task if you want to start it automatically each time you start your computer.
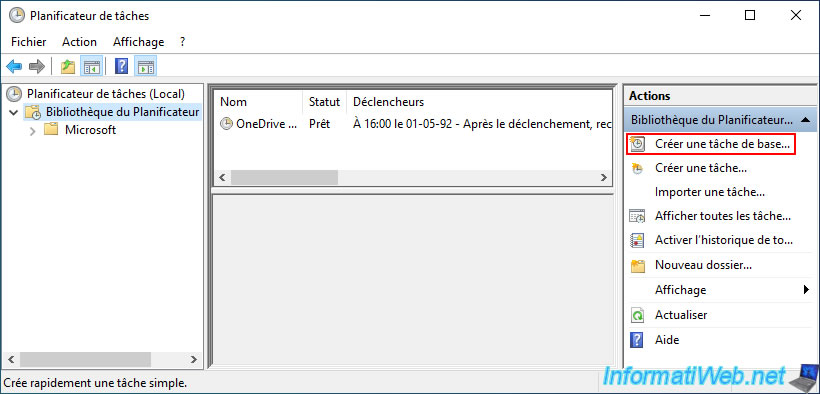
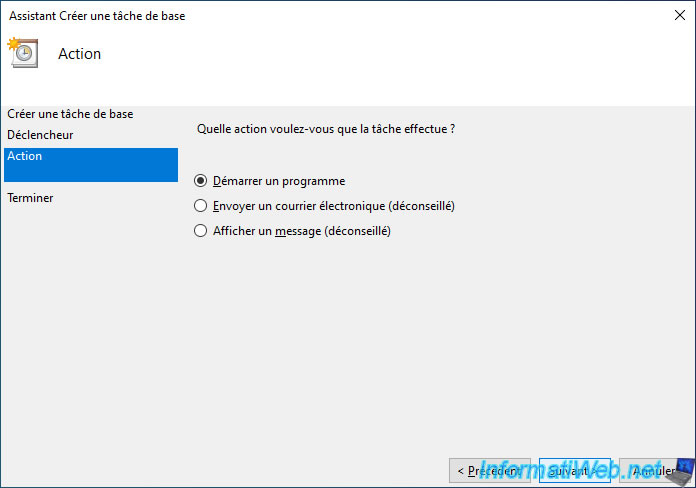
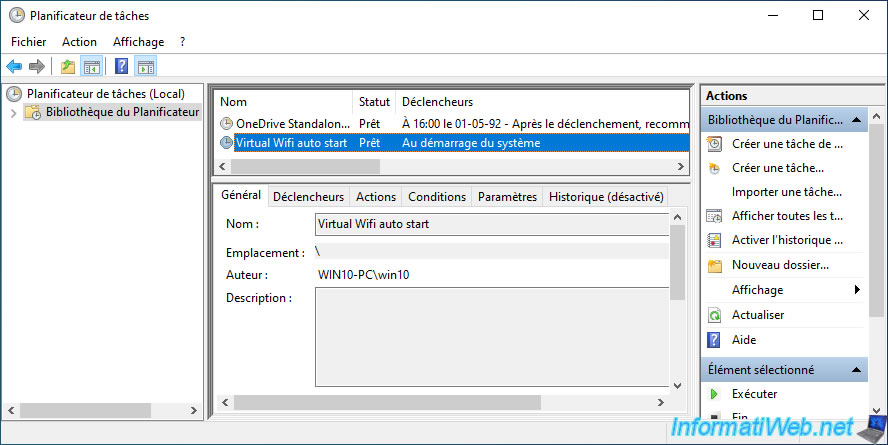
Open Task Scheduler, select the "Task Scheduler Library" folder (in the left column), then click "Create Basic Task" (in the right column).
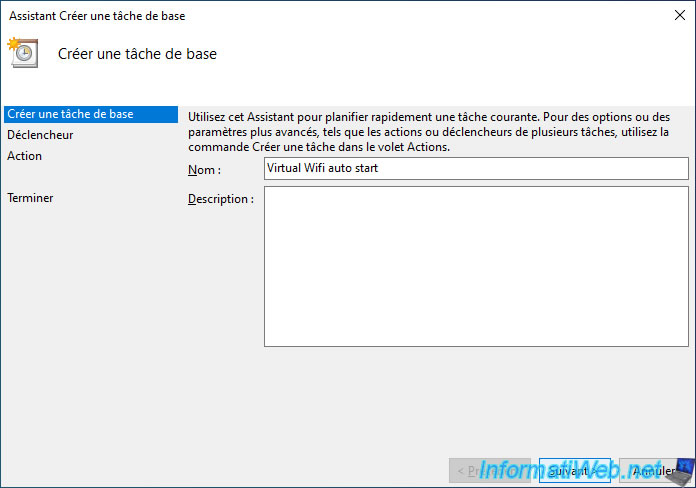
Specify "Virtual Wifi auto start" as the name.
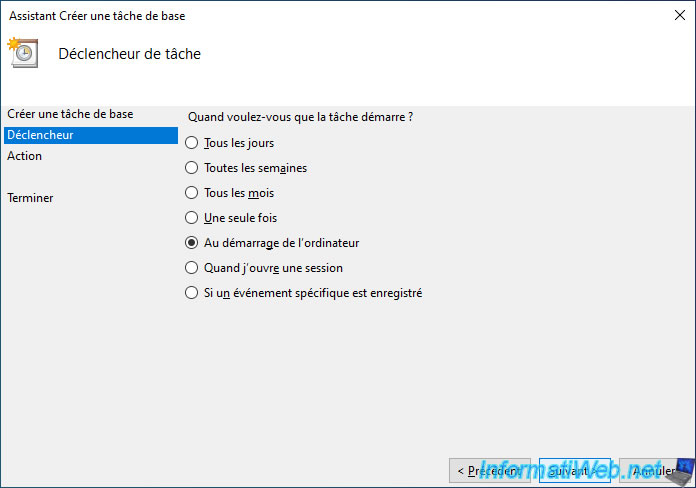
Choose the "When the computer starts" trigger.
Thus, the hosted wireless (Wifi) network will start automatically when Windows starts up and it will not be necessary to open a session on your computer for it to start.
Choose the "Start a program" action.
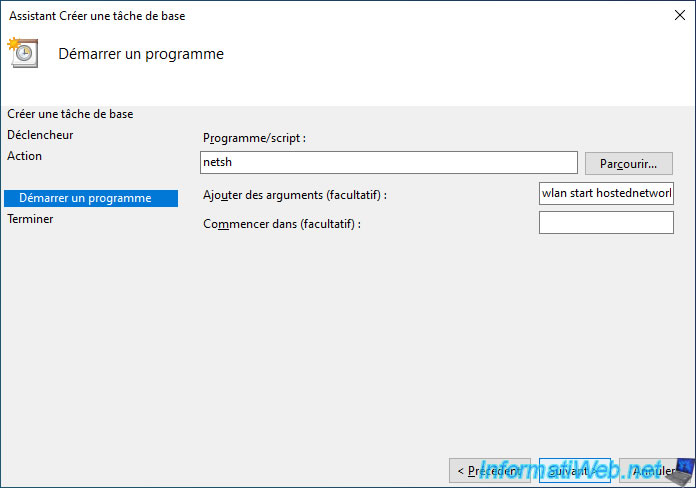
The command to start the wireless (Wifi) hosted network is : netsh wlan start hostednetwork.
To launch this command from a scheduled task, all you have to do is specify :
- Program : netsh
- arguments : wlan start hostednetwork
Check the "Open the properties for this task when I click Finish" and click on : Finish.
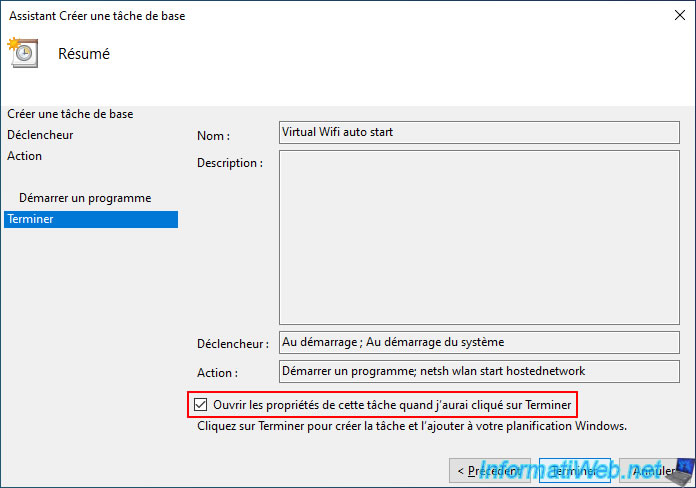
The "Virtual Wifi auto start Properties (Local Computer)" window appears.
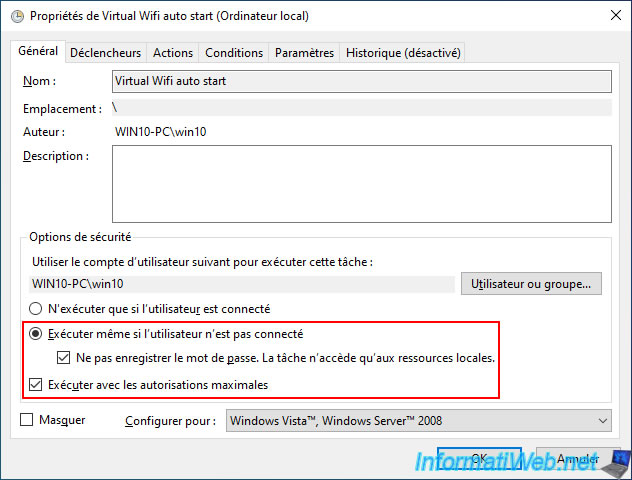
Configure these security options :
- select "Run whether is logged on or not" so that the task can start since the trigger selected previously is "When the computer starts" and not "When I log on".
- check the "Do not store password. The task will only have access to local computer resources" box as a security measure.
- check the "Run with highest privileges" box to have the command run as administrator.
In the "Conditions" tab, uncheck the "Start the task only if the computer is on AC power" box to be sure that this task can be executed, even on your laptop PC (if applicable).
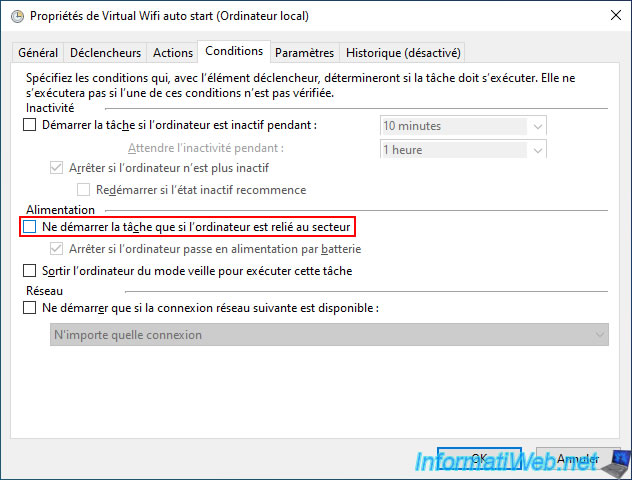
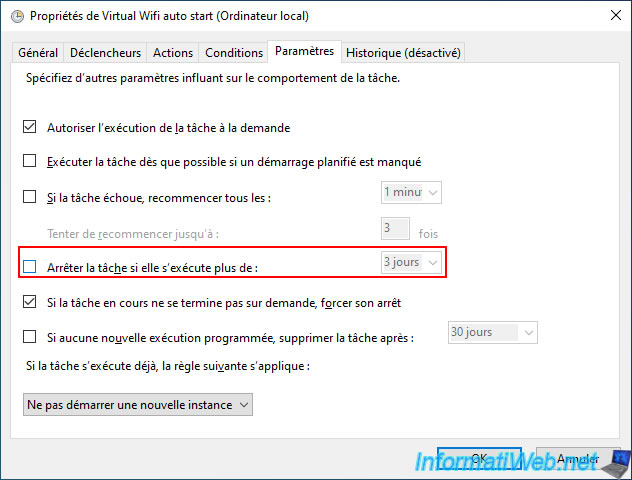
In the "Settings" tab, uncheck the "Stop the task if it runs longer than: 3 days" box so that the task can start each time you start your computer.
The task is created.
Restart your computer and you will see that the Wifi network will be available despite shutting down and restarting Windows.
Share this tutorial
To see also
-

Virtualization 8/23/2019
Enable the Hyper-V feature
-

Windows 1/28/2017
Speed up your computer (ReadyBoost)
-
Windows 1/20/2025
Windows 10 - Disable distribution of updates on the local network
-

Windows 3/13/2021
Windows 7 - Switching from IDE to AHCI without reinstalling Windows
You must be logged in to post a comment