- Windows
- Windows 8 / 8.1, Windows 10, Windows 11
- 25 July 2024 at 10:37 UTC
-

On Windows 8, 8.1 and 10, it's no longer possible by default to start in safe mode (for example) by pressing the F8 key at startup.
Indeed, this feature has been disabled by Microsoft by default.
However, it's possible to reactivate this F8 menu by changing the configuration of the Windows 8 / 8.1 / 10 / 11 start menu.
Warning : although this tutorial works from Windows 8 to Windows 11, it does't work on the latest versions of Windows 10 (which is strange, but true).
Indeed, according to our tests carried out on Windows 10, it works up to version 2004 (20H1).
On the latest versions of Windows 10, activating the F8 menu seems impossible. Although the same commands work again on Windows 11 21H2.
- Enable or disable the F8 menu on Windows 8, 8.1 and 10
- Enable or disable the F8 menu on recent versions of Windows 10 and 11
- Enable or disable the F8 menu from the installation DVD of Windows 8, 8.1, 10 and 11
1. Enable or disable the F8 menu on Windows 8, 8.1 and 10
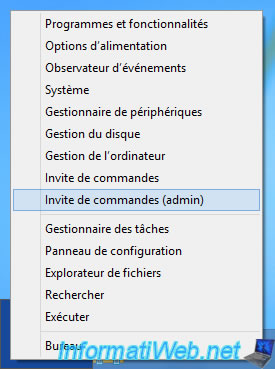
To do this, place the cursor at the bottom left of the screen (or on the "Start" button if it's present), then right click "Command Prompt (Admin)".
To reactivate this menu, type this command :
Batch
bcdedit /set {default} bootmenupolicy legacy
Plain Text
The operation completed successfully.
Then, on reboot, press the F8 key to display the old "Advanced Boot Options" menu.

To deactivate this menu and return to the original configuration, use this command :
Batch
bcdedit /set {default} bootmenupolicy standard
Plain Text
The operation completed successfully.
2. Enable or disable the F8 menu on recent versions of Windows 10 and 11
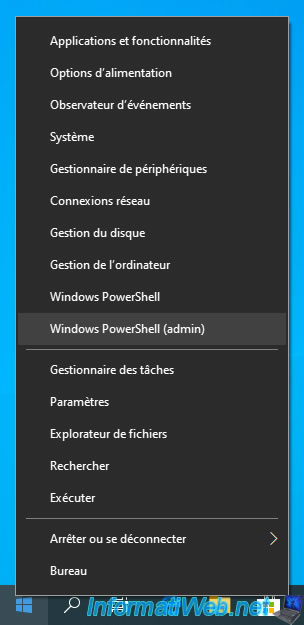
On recent versions of Windows 10 (at least since version 1903 and up to version 2004) or on Windows 11, right click on the "Start" button and click on "Windows PowerShell (admin)".
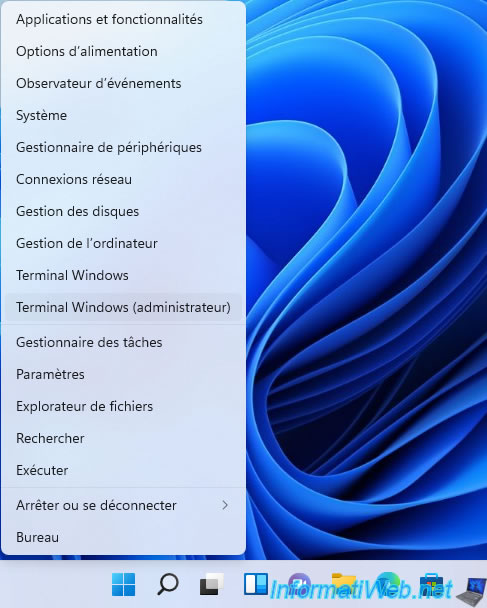
On Windows 11, right-click on the "Start" button and click on : Windows Terminal (Admin).
To reactivate the F8 menu, type this command :
Batch
bcdedit /set bootmenupolicy legacy
Plain Text
The operation completed successfully.
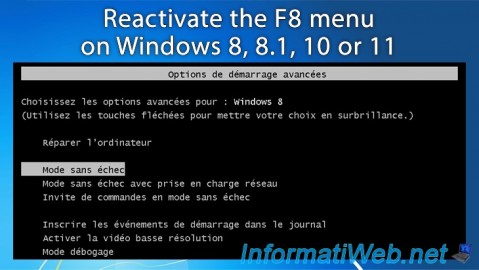
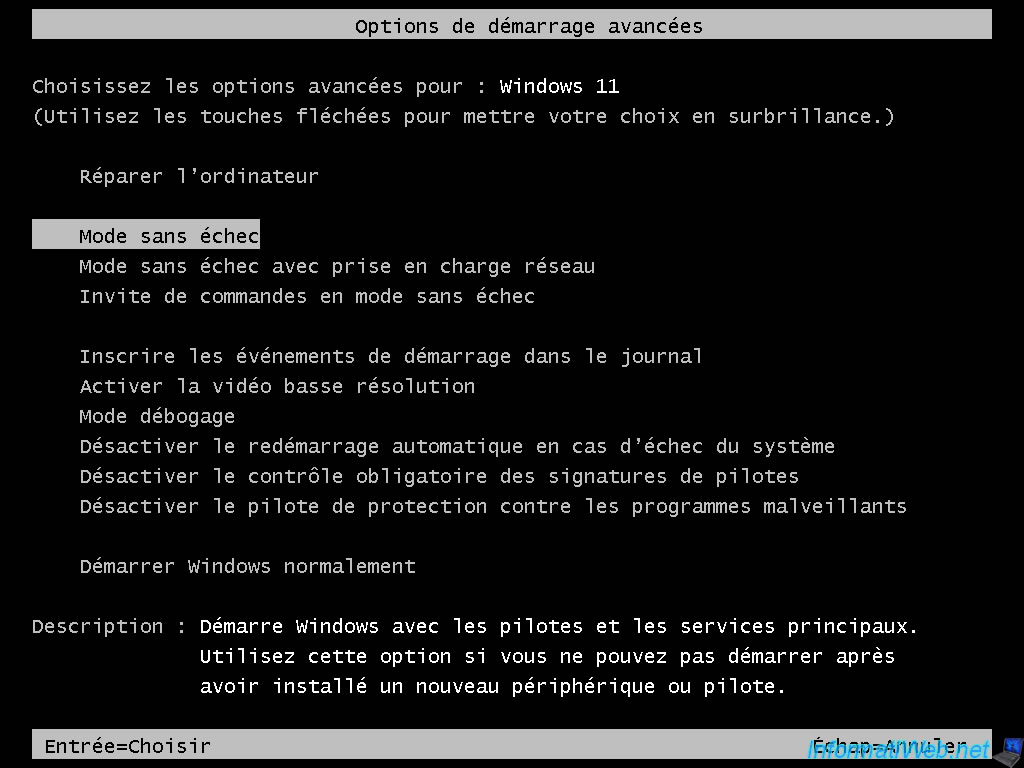
When starting your computer, press the F8 key to display the "Advanced Boot Options" menu which is identical to that of Windows 8.
Here is an example on Windows 10.

Here is another example on Windows 11.
To undo this change and return to the original configuration, use this command :
Batch
bcdedit /set bootmenupolicy standard
Plain Text
The operation completed successfully.
3. Enable or disable the F8 menu from the installation DVD of Windows 8, 8.1, 10 and 11
If Windows does not start anymore and you had not enabled this F8 menu, here is how to enable it from the installation DVD of your version of Windows (8, 8.1, 10 and 11).
First, configure your computer's BIOS to boot to your CD/DVD drive, then insert the Windows installation DVD into your CD/VD drive and restart your computer.
If a message telling you to press a key to boot from this installation DVD appears, press a key on your keyboard (eg the "Enter" key).
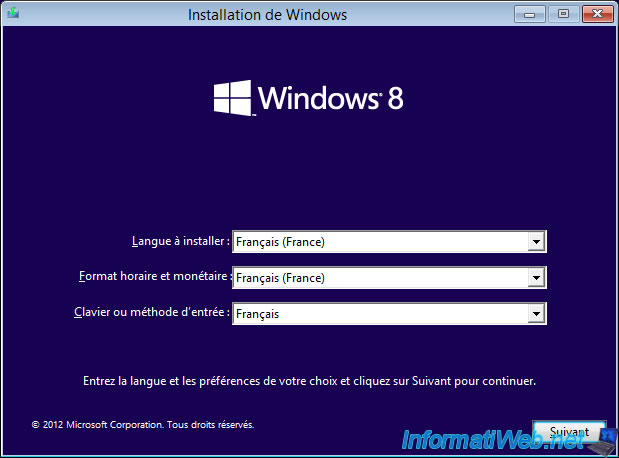
Wait while your computer starts up on this Windows 8, 8.1, 10 and 11 installation DVD, then select your language from the different lists.
Then, click on Next.
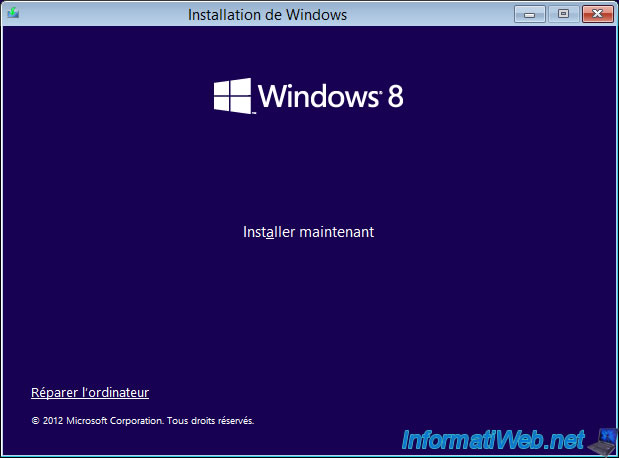
Click the "Repair your computer" option at the bottom left.
A sky blue screen will appear.
Click on the "Troubleshoot" option.

On Windows 8 and 8.1, you will need to click on "Advanced options".
On Windows 10 and 11, skip this step and go to the next image.

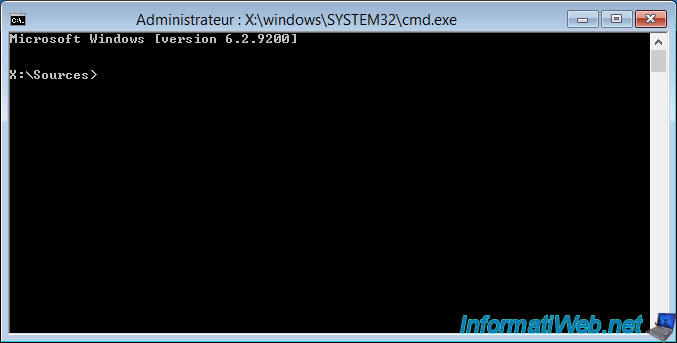
Click on : Command Prompt.

A command prompt (cmd.exe) launches as an administrator.
By default, the command prompt working directory is "X:\Sources" which doesn't exist on your physical hard drive.
This folder is managed by Windows PE which is a preinstalled environment launched only in random access memory (RAM) by the Windows installation DVD.
To change the boot manager of your Windows installation, you must first find the letter of the partition where the "Windows" folder is located.
To do this, simply use the "dir" command (which allows you to list the folders and files of a folder or a partition) and specify the letter of the desired partition as a parameter.
Usually this will be the "C" or "D" letter. It all depends on your version of Windows and how it was installed.
In our case, the "C" partition points to the "System Reserved" partition of Windows 8. This hidden partition (Windows RE) installed with Windows 8 contains the Windows repair tools.
Batch
dir C:
Plain Text
 Volume in drive C is System Reserved
 Volume Serial Number is 38E2-19D7

 Directory of C:\
But, the "D" partition contains the "Windows" folder.
It is therefore in this partition that the boot manager is located.
Batch
dir D:
Plain Text
 Volume in drive D has no label.
 Volume Serial Number is 16E2-78ED

 Directory of D:\

28/02/2021  01:10 PM               128 log1.txt
28/02/2021  01:10 PM                 0 log2.txt
26/07/2012  08:33 AM    <DIR>          PerfLogs
28/02/2021  11:27 AM    <DIR>          Program Files
26/07/2012  09:13 AM    <DIR>          Program Files (x86)
12/04/2020  02:59 PM    <DIR>          Users
28/02/2021  11:29 AM    <DIR>          Windows
               2 File(s)              128 bytes
               5 Dir(s)  50,370,134,016 bytes free
Once you have found the partition containing the "Windows" folder, move into it.
In our case, we are therefore moving into the "D" partition.
Batch
cd /d D:
Enable the F8 menu for your version of Windows using the command appropriate for your version of Windows.
Note : these are the same commands as those mentioned earlier in this tutorial.
For Windows 8, 8.1 and 10 (old versions) and 11 :
Batch
bcdedit /set {default} bootmenupolicy legacy
For Windows 10 version 1903 or later :
Batch
bcdedit /set bootmenupolicy legacy
Close the command prompt and restart your computer.
Now, the F8 menu is available by pressing the F8 key while your computer is starting up.
Share this tutorial
To see also
-

Windows 3/8/2022
Upgrade from Windows 10 to Windows 11 (from DVD)
-
Windows 6/26/2023
Windows 11 - Configure default programs
-

Windows 2/2/2022
Windows 11 - Create a bootable USB key to install Windows 11
-

Windows 12/29/2015
Windows 8 / 8.1 - Formatting and reinstalling
You must be logged in to post a comment