Manually install Windows 11, 10, 8.1, 8 and 7 in UEFI mode (GPT)
- Windows
- Windows 8 / 8.1, Windows 7, Windows 10, Windows 11
- 02 May 2025 at 08:54 UTC
-

- 2/3
3. Copy Windows installation files to desired hard drive or SSD
3.1. Use a GPT partition table on the desired destination disk
Use the keyboard shortcut "SHIFT + F10" to open the Windows PE command prompt (cmd.exe).
A black window like below will appear.
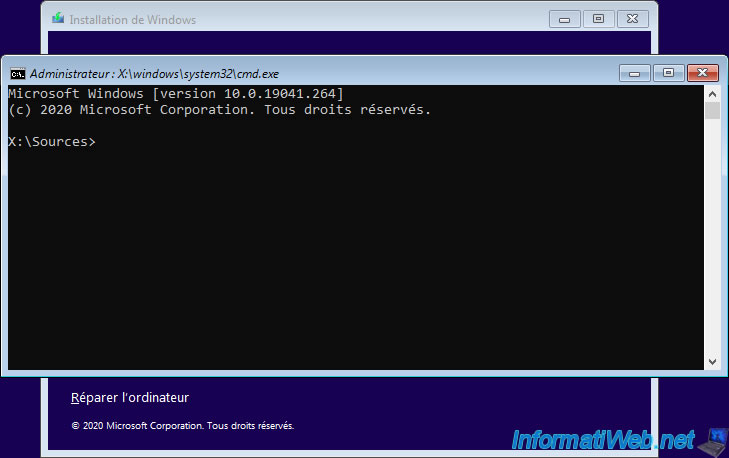
In the displayed command prompt, launch the "DiskPart" program.
Batch
diskpart
Next, view the list of physical disks present in your computer.
Batch
list disk
In our case, there is only one.
So its number is 0.
Plain Text
Disk ###  Status         Size     Free     Dyn  GPT
--------  -------------  -------  -------  ---  ---
Disk 0    Online           80 GB    80 GB
Select it by typing the command below.
Batch
sel disk 0
Plain Text
Disk 0 is now the selected disk.
Completely erase this disk by typing the command below.
Warning : this will permanently erase the data on the selected disk.
Batch
clean
Plain Text
DiskPart successfully cleaned the disk.
Then, convert your disk to GPT.
Batch
convert gpt
Plain Text
DiskPart successfully converted the selected disk to GPT format.
3.2. Create system partitions (EFI/MSR) required for UEFI mode boot
To get started, create the 100 MB EFI partition that Windows requires for UEFI booting.
Source: Boot to a virtual hard disk: Add a VHDX or VHD to the boot menu | Microsoft Learn.
Batch
create partition efi size=100
Plain Text
DiskPart successfully created the specified partition.
Quickly format this partition to FAT32 and name it "System".
Warning : the file system and name chosen for this partition are important.
Batch
format quick fs=fat32 label="System"
Plain Text
  100 percent completed

DiskPart successfully formatted the volume.
Assign the letter "S" to this EFI system partition.
Warning : the assigned letter is important. Do not change it.
Batch
assign letter=S
Plain Text
DiskPart successfully assigned the drive letter or mount point.
Then, when Windows is installed in UEFI mode, a MSR (Microsoft Reserved) partition is also necessary (see source cited above).
To create this second system partition, use the command below.
Batch
create partition msr size=128
Plain Text
DiskPart successfully created the specified partition.
3.3. Create the partition where Windows is installed
Now that the system partitions required for booting Windows in UEFI mode are created, create a primary partition on the remaining unallocated space on your disk using the command below. This is the partition on which you will later install Windows.
Batch
create partition primary
Plain Text
DiskPart successfully created the specified partition.
Format this NTFS partition and name it with the version you want to install.
For example: Windows 10.
Note: the name does not matter, this is just for reference.
Batch
format quick fs=ntfs label="Windows 10"
Plain Text
  100 percent completed

DiskPart successfully formatted the volume.
Assign the letter "C" to this partition (for convenience).
Batch
assign letter="C"
Plain Text
DiskPart successfully assigned the drive letter or mount point.
List the available volumes on your computer to locate the CD/DVD drive letter where your Windows installation DVD is located.
Batch
list vol
As you can see, in our case, the CD/DVD drive has the letter "D".
Note: it is normal that the 128 MB "MSR" partition created earlier does not appear.
This is only visible by using the "list partition" command in DiskPart instead of "list vol".
Plain Text
Volume ###  Ltr  Label        Fs     Type        Size     Status     Info
----------  ---  -----------  -----  ----------  -------  ---------  --------
Volume 0     D   CCCOMA_X64F  UDF    DVD-ROM     5046 MB  Healthy
Volume 1     C   Windows 10   NTFS   Partition     79 GB  Healthy
Volume 2     S   SYSTEM       FAT32  Partition    100 MB  Healthy    Hidden
Once you know the letter currently assigned to your CD/DVD drive, exit DiskPart to return to the command prompt (cmd.exe).
Batch
exit
As you can see, the prefix below reappears.
Plain Text
X:\Sources>
3.4. Copy Windows installation files to desired destination disk
Depending on the Windows installation DVD you are using, the file needed here may be compressed (install.esd) or not (install.wim).
To find out the extension of the image file "install.xx", use the command below, replacing the letter "D" with the letter of your CD/DVD drive.
Batch
dir D:\sources\install.*
As you can see, in our case this file is called "install.wim".
Plain Text
Volume in drive D is named CCCOMA_X64FRE_FR-FR_DV9
Volume Serial Number is XXXX-XXXX

Directory of D:\sources

11-05-20  07:45     4.494.699.121 install.wim
               1 File(s)   4,494,699,121 bytes
               0 Dir(s)                0 bytes free
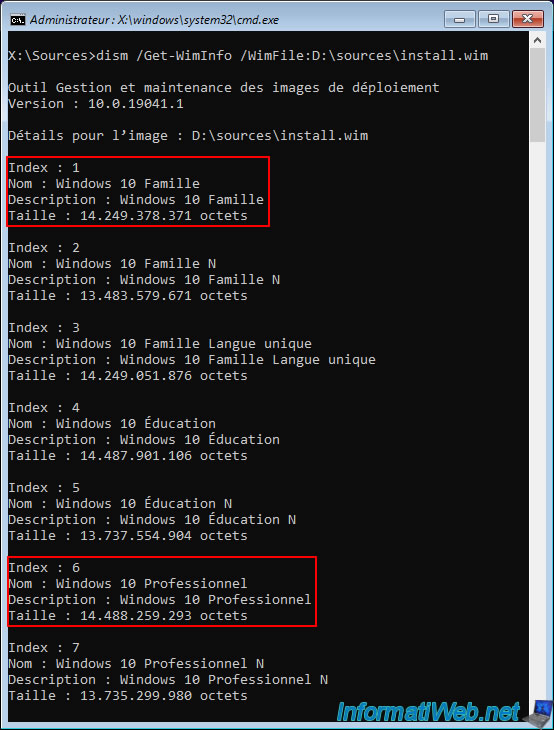
List the editions present in this installation file using the command below.
Batch
dism /Get-WimInfo /WimFile:D:\sources\install.wim
As you can see, in our case, this installation DVD has the "Home" (index: 1) and "Professional" (index: 6) editions.
Important : select the edition corresponding to your serial number otherwise you will not be able to activate Windows.
Plain Text
Deployment Image Servicing and Management tool
Version: 10.0.19041.1

Details for image : D:\sources\install.wim

Index : 1
Nom : Windows 10 Home
Description : Windows 10 Home
Size : 14,249,378,371 bytes

...

Index : 6
Nom : Windows 10 Pro
Description : Windows 10 Pro
Size : 14,488,259,293 bytes
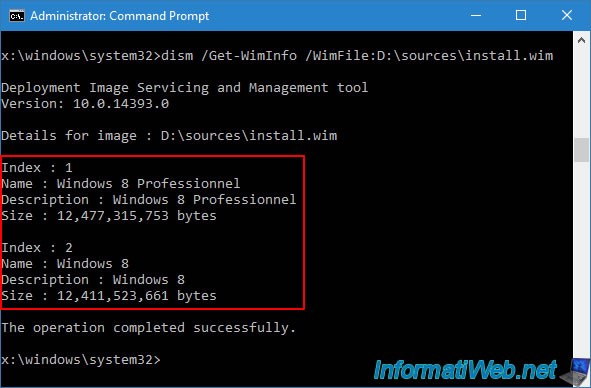
If you are trying to manually install Windows 8 or 7, you must have booted to the "Hiren's BootCD PE" live CD.
In this case, you can see that the "dism" command works without any problems because this live CD uses a Windows PE environment based on Windows 10.
Copy the installation files for the desired edition of Windows using the command below.
- /Apply-Image : indicates that Dism should apply the desired installation image.
- /ImageFile:D:\sources\install.wim : allows you to specify the path to the installation file (install.wim or install.esd) present on your Windows installation DVD
- /Index:6 : allows you to specify which edition you want to install.
In our case, the "Pro" edition (as you can see above). - /ApplyDir:C:\ : allows you to indicate that the desired installation image should be deployed on the "C" partition in our case.
Batch
dism /Apply-Image /ImageFile:D:\sources\install.wim /Index:6 /ApplyDir:C:\
Please wait while the "install.wim" or "install.esd" image is applied to your "C" partition.
Plain Text
Deployment Image Servicing and Management tool
Version : 10.0.19041.1

Applying image
[======                     10.0%                          ]
Once the process is completed, the message "The operation completed successfully" will be displayed.
Plain Text
Applying image
[==========================100.0%==========================]
The operation completed successfully.
Important : for your computer to boot into Windows 11, 10, or 8.1, you must create the boot files for UEFI mode on the 100 MB EFI system partition (which currently has the letter "S").
Batch
bcdboot C:\Windows /s S: /f UEFI
Plain Text
Boot files successfully created.
Warning : for Windows 8, you have booted on the live CD "Hiren's BootCD PE" which uses a Windows PE environment based on Windows 10.
To create the correct boot files, you must therefore use the "bcdboot" program of your new Windows 8 installation and not the "bcdboot" program of the live CD.
To do this, use the command below.
Batch
C:\Windows\system32\bcdboot C:\Windows /s S: /f UEFI

Warning : although Windows 7 supports UEFI booting, the Windows 7 "bcdboot" program does not create the boot files needed for UEFI mode.
Indeed, the "/f UEFI" parameter does not exist for the "bcdboot" program on Windows 7 and using the Windows 7 "bcdboot" command with a GPT partition table (required for UEFI booting) will cause the error below.
Batch
C:\Windows\system32\bcdboot C:\Windows /s S:
Plain Text
BFSVC: Failed to create a new system store. Status = [c000003a]
Important : to boot on Windows 7 in UEFI mode, you will therefore be forced to use the Windows 10 "bcdboot" program (i.e. the one from the Windows PE environment of the "Hiren's BootCD PE" live CD that you are currently using).
To do this, type the command below.
Batch
bcdboot C:\Windows /s S: /f UEFI
Plain Text
Boot files successfully created.
Now that your partitions are properly configured, remove the Windows installation DVD from your CD/DVD drive.
Then, close the Windows installer by clicking on the cross located at the top right of the window, then confirm by clicking on "Yes".
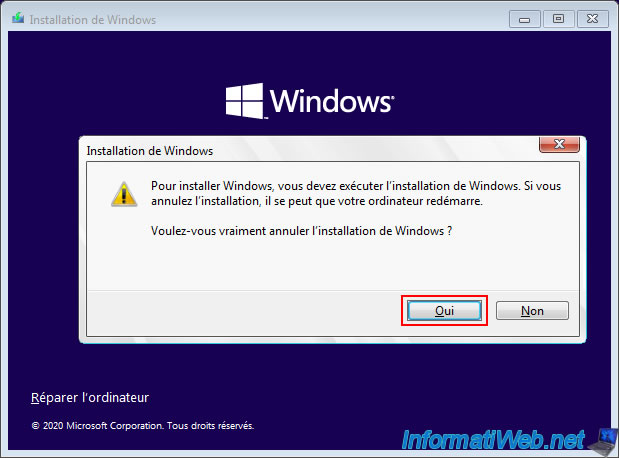
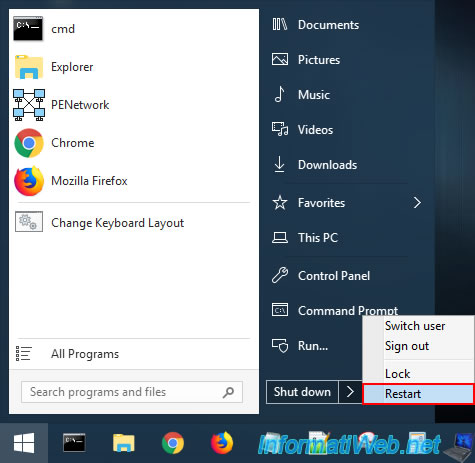
If you used the "Hiren's BootCD PE" live CD, go to the start menu and click "Restart" to restart your computer.
Share this tutorial
To see also
-
Windows 9/5/2020
Upgrade from Windows 8 / 8.1 to Windows 10 (free)
-
MultiBoot 8/12/2024
VHD/VHDX multiboot - Upgrade Windows 11 to newer version of Win 11
-
Windows 2/6/2025
Windows 10 - Change file explorer shortcuts
-
Windows 6/16/2018
Windows 7 / 8 / 8.1 - File sharing
No comment