- Virtualization
- VirtualBox
- 20 July 2026 at 07:58 UTC
-

- 1/5
If you want to test the "Unraid" NAS solution using VirtualBox, here is how you need to configure the virtual machine to be able to use Unraid on VirtualBox.
Warning : creating virtual machines on Unraid will not be possible by virtualizing Unraid on VirtualBox (as you will see at the end of this tutorial).
On the other hand, Unraid, plugins, as well as applications running via Docker will work without any problem.
If you want to virtualize Unraid while also supporting the creation of virtual machines on Unraid, then use VMware Workstation Pro instead as explained in our tutorial: Virtualize Unraid 6.9.2 with VMware Workstation 17.5.1.
Important : since the license (as well as the 30-day trial version) is linked to the unique identifier of your USB key, you are required to use a real USB key that you will connect to your Unraid virtual machine.
Note: this tutorial was made with VirtualBox v7.0.12.
- Create and configure your Unraid virtual machine on VirtualBox
- Create the virtual disks that will be used by Unraid in your virtual machine on VirtualBox
- Configure your Unraid virtual machine on VirtualBox
- Start your Unraid virtual machine on VirtualBox
- Start the Unraid evaluation period
- Disk types seen by Unraid
- Configure Unraid array
- Install the Community Applications plugin
- Enable automatic array startup
- Using applications via Docker on Unraid
- Cleanly shut down your Unraid server
- Non-functional nested virtual machines on Unraid (virtualized with VirtualBox)
1. Create and configure your Unraid virtual machine on VirtualBox
Before you start, make sure that the VirtualBox Extension Pack is installed and up to date in your case.
Indeed, you will need the USB controller that is present in this pack.
Then, create your Unraid USB key and download Plopkexec (which you will need to boot your virtual machine on your Unraid USB key) by following steps 1 and 2 of our tutorial "Virtualize Unraid 6.9.2 with VMware Workstation 17.5.1".
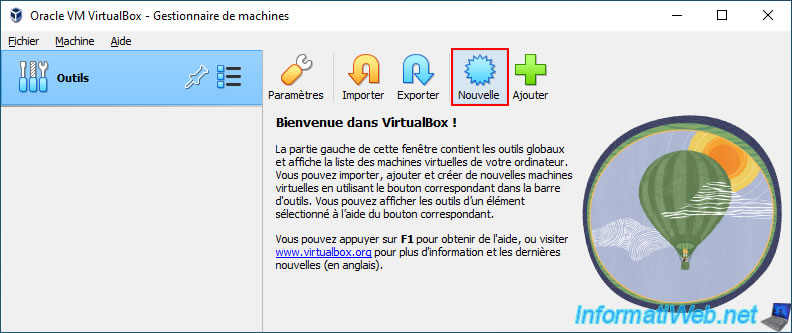
Now, in the VirtualBox window, click on: New.
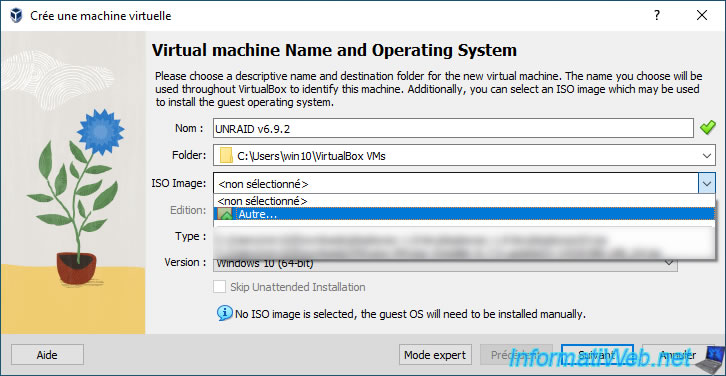
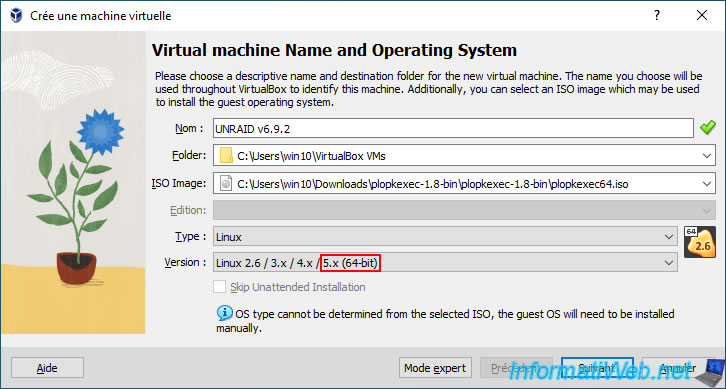
In the "Create a virtual machine" wizard that appears, enter a name for your virtual machine.
In our case: UNRAID v6.9.2.
Then, in the "ISO Image" list, select "Other".
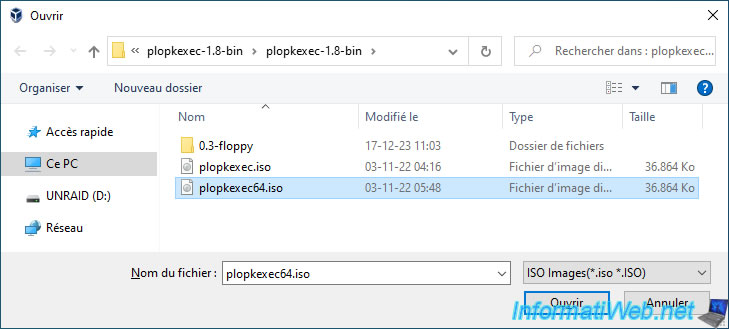
Select the "plopkexec64.iso" file of the "PlopKexec" tool downloaded previously.
For the guest operating system, select:
- Type : Linux.
- Version : Linux 2.6 / 3.x / 4.x / 5.x (64-bit).
Indeed, Unraid v6.9.2 uses a Linux kernel version 5.10.28. Additionally, Unraid requires a 64-bit processor.
Source : Release Notes | Unraid Docs (choose a version and look at the Linux kernel version used in the "Changelog" section of the page).
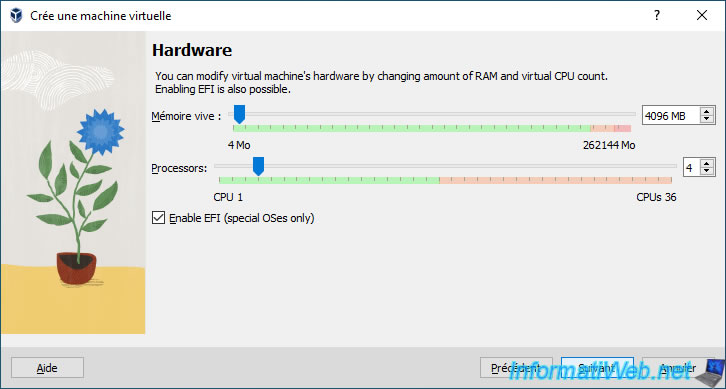
In the "Hardware" step, specify:
- RAM: 4096 MB.
Indeed, to be able to use applications on Unraid via Docker, it is recommended to have at least 4 GB (4096 Mb) of RAM. - Processors: 4.
Again, to use applications via Docker, it is recommended to use a processor with at least 4 cores. - Enable EFI (special OSes only): check this box to enable booting in UEFI mode (IF you checked the "Allow UEFI Boot" box when creating your Unraid USB key).
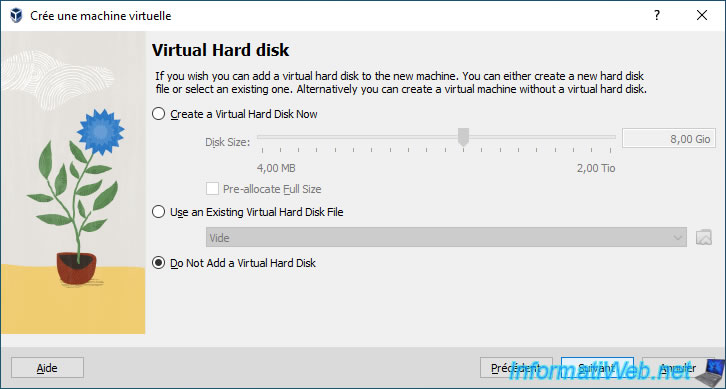
Skip creating the Virtual Hard Disk for now by selecting "Do Not Add a Virtual Hard Disk".
This is because we will create the Virtual Hard Disks and Virtual SSDs later so that we can manually specify the names of the files that will be created on your physical computer.
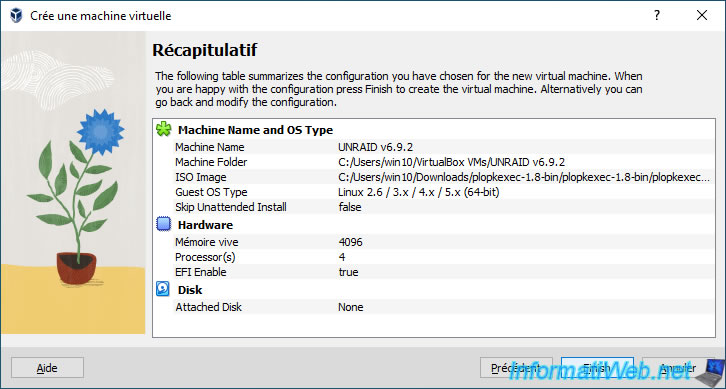
A summary of your Unraid virtual machine configuration appears.
Click Finish.
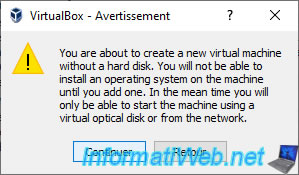
Ignore the warning that you are trying to create a virtual machine WITHOUT a virtual hard disk.
Click Continue.
Plain Text
You are about to create a new virtual machine without a hard disk.
2. Create the virtual disks that will be used by Unraid in your virtual machine on VirtualBox
2.1. Create virtual hard disks for Unraid array on VirtualBox
To begin, select your virtual machine "UNRAID v6.9.2" and click on: Configuration.
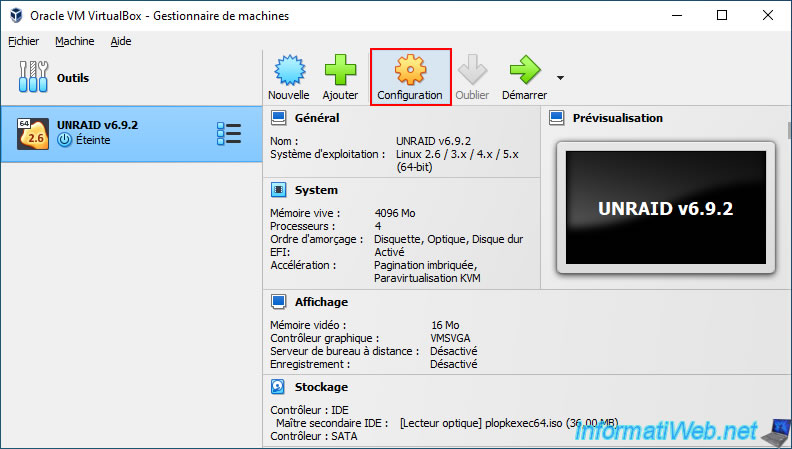
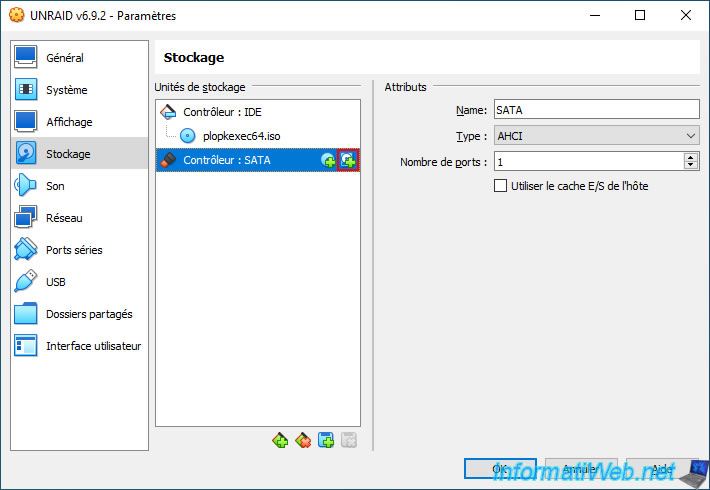
In the "Storage" section, you will see that there is already a SATA controller in the virtual hardware of your virtual machine.
If it is not there, you can add it by clicking on the "+" icon at the bottom of the list.
Important : for your virtual hard disks to be recognized by Unraid, you can only use virtual hard disks connected to a SATA and/or IDE controller.
However, the IDE controller is physically limited to 4 virtual hard disks. Unlike the SATA controller which will allow you to connect many virtual hard disks.
Note that virtual hard disks connected to a SCSI controller (regardless of its type) will never appear on Unraid.
In addition, Unraid only recognizes one virtual hard disk per NVMe controller and you can only create one NVMe controller per virtual machine on VirtualBox, unlike VMware Workstation Pro where you can add several.
Click the "+" icon with the hard drive icon located to the right of "Controller: SATA".
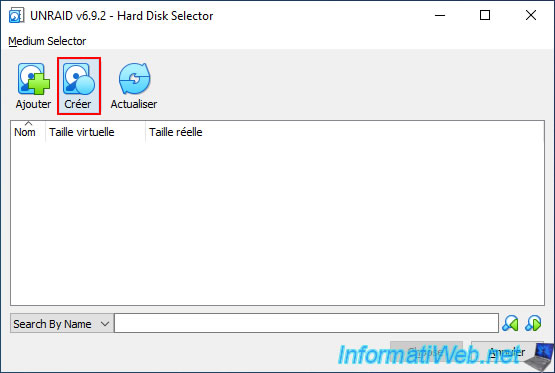
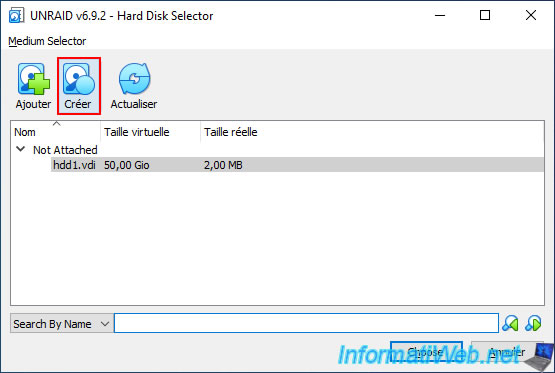
In the "UNRAID v6.9.2 - Hard Disk Selector" window that appears, click: Create.
In the "Create Virtual Hard Disk" window that appears, leave the "VDI (Virtual Disk Image)" format selected by default since it is the native format of VirtualBox, then click Next.
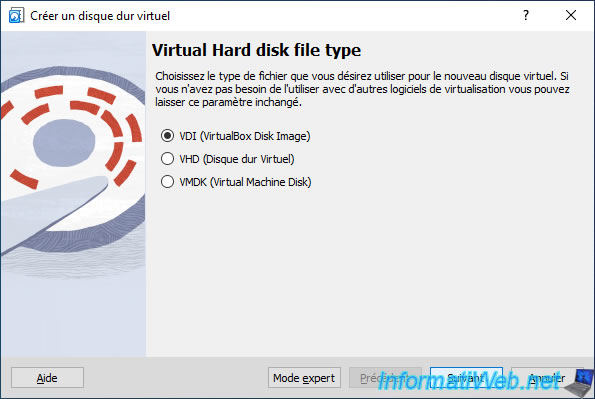
Click Next.
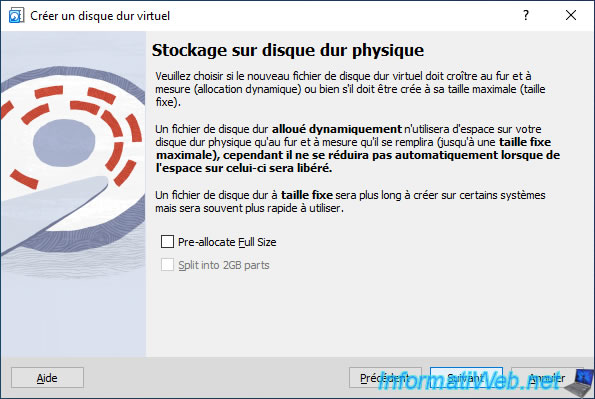
Note: by default, the virtual hard disk dynamically takes the size of the data it contains, on the physical PC.
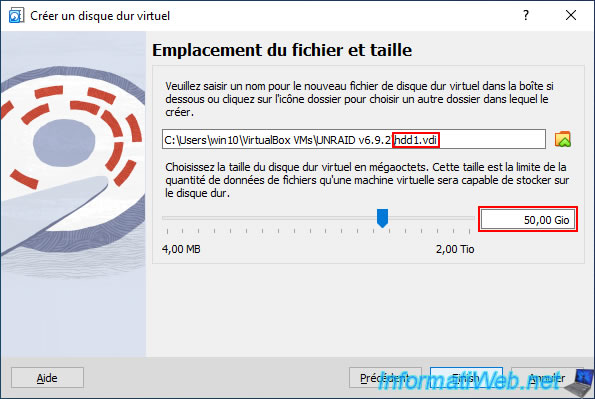
Specify "hdd1.vdi" for the file name of this virtual hard disk (e.g. hdd1.vdi) and choose a size for it.
In our case, we used a size of 50 GB to avoid the calculation of the parity disk on Unraid taking too much time for this tutorial.
Note that we will create 3 virtual hard disks with the same size for the Unraid array.
Important : the size specified for your 3 virtual hard disks must be identical.
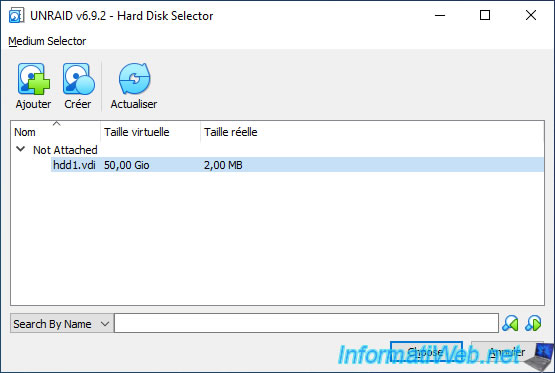
The created virtual hard disk appears in the list of your virtual hard disks.
However, for the moment, it is not used by your virtual machine.
Click "Create" again to create a 2nd virtual hard drive.
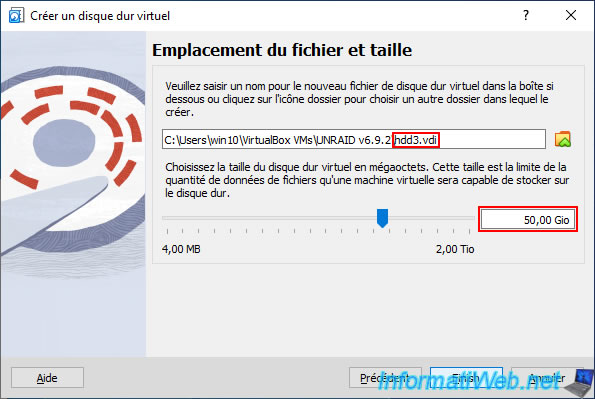
For the 2nd VHD, specify "hdd2.vdi" as the name for the VHD file and specify the same size as for your 1st VHD.
In our case: 50 GB.
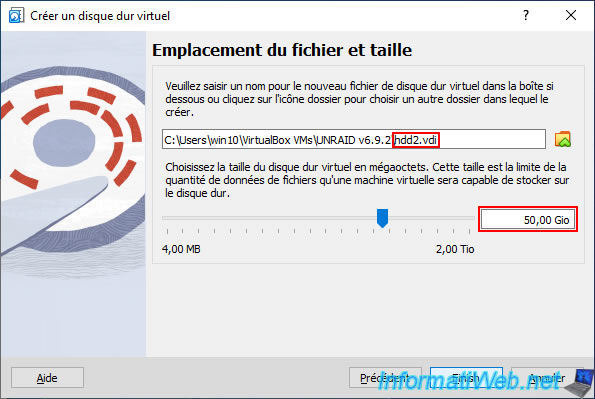
For the 2nd VHD, specify "hdd2.vdi" as the name for the VHD file and specify the same size as for your 1st VHD.
In our case: 50 GB.
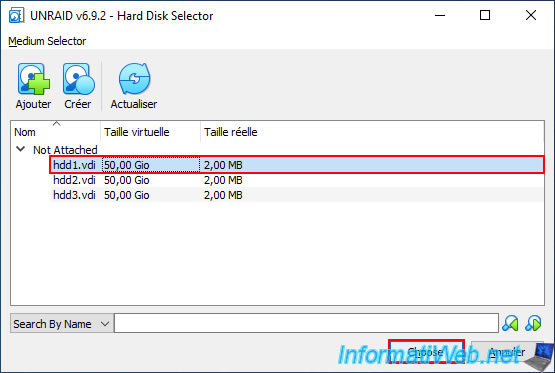
Your 3 virtual hard disks (hdd1.vdi, hdd2.vdi and hdd3.vdi) appear in the list.
Select your 1st virtual hard disk (hdd1.vdi) and click on: Choose.
Your 1st virtual hard disk (hdd1.vdi) appears in the list of disks connected to your virtual SATA controller.
Click on the "+" icon with the hard disk icon (as before).
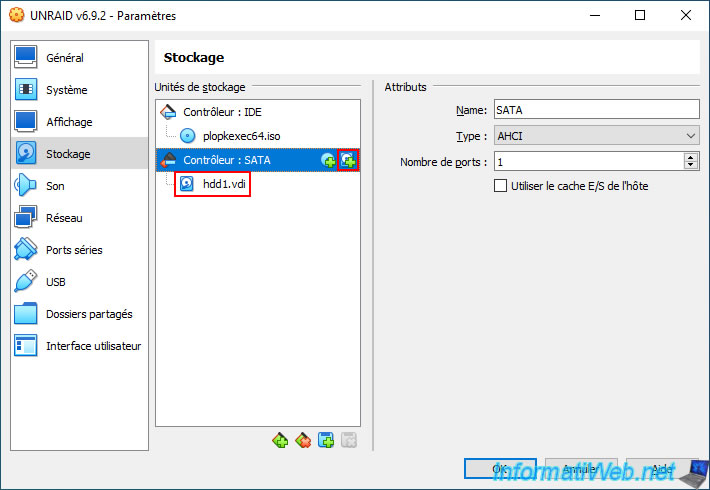
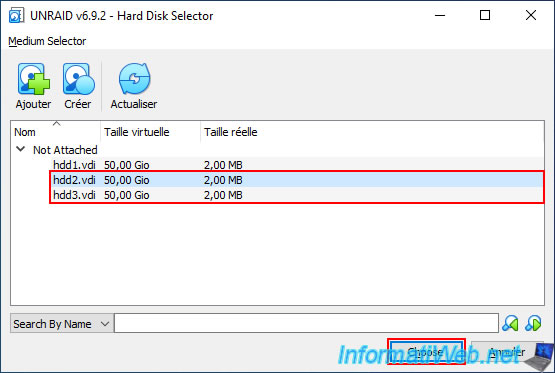
Select your 2nd virtual hard disk (hdd2.vdi) and click on: Choose.
Then, do the same for your 3rd virtual hard disk (hdd3.vdi).
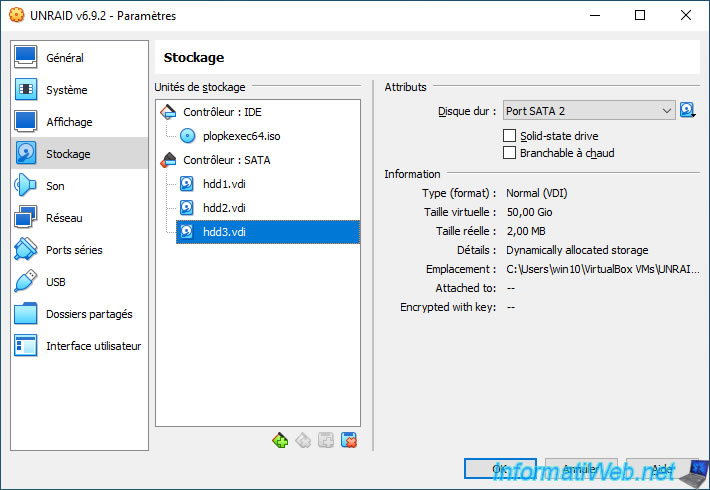
Your 3 virtual hard drives (hdd1.vdi, hdd2.vdi and hdd3.vdi) are connected to your SATA controller.
Share this tutorial
To see also
-

Virtualization 7/7/2018
VirtualBox - Installing and virtualizing your 1st machine
-

Virtualization 9/15/2018
VirtualBox - Network access modes of a virtual machine
-
Virtualization 1/17/2020
VirtualBox - Transfer files using the built-in file manager
-
Virtualization 12/12/2022
VirtualBox - Virtualize Windows 11 (supported hardware)
You must be logged in to post a comment