- Windows
- Windows 8 / 8.1, Windows 7, Windows 10, Windows 11
- 19 May 2025 at 14:37 UTC
-

- 1/3
Although it's recommended (for performance reasons) to use a real RAID controller (such as the "Microsemi Adaptec SmartRAID" for example) which therefore has its own processor and RAM, it is also possible to create JBOD volumes or RAID 0 or RAID 1 volumes via Windows disk management.
For this tutorial, we created these spanned volumes (JBOD), striped volumes (RAID 0), ... on Windows 10, but it is also possible to create them on other versions of Windows.
Warning : spanned volumes, mirrored volumes, ... allow you to use a software RAID and not a hardware RAID.
The performance and/or fault tolerance will therefore be better than with a single physical disk, but less good than if you used a hardware RAID with a physical RAID controller (such as the "Microsemi Adaptec SmartRAID" RAID controller mentioned above).
In addition, you will be dependent on the system provided by Windows. Which means that a software update, Windows upgrade or firmware update could potentially cause problems later.
Note: tutorial made on Windows 10 v2004 and also tested on Windows 11, 8.1, 8 and 7 SP1.
- New volume types available for dynamic disks on Windows
- What is the difference between a spanned volume (JBOD) and a striped volume (RAID 0)?
- Spanned volume (software JBOD)
- Striped volume (software RAID 0)
- Mirrored volume (software RAID 1)
- RAID-5 volume (not available on Windows)
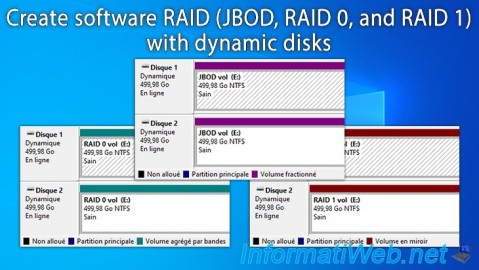
1. New volume types available for dynamic disks on Windows
The purpose of these new volume types is to be able to benefit from a volume larger than the size of a physical disk, to improve the performance of a volume (partition) or to secure stored data against the loss of a physical disk (hard disk, SSD, ...), ...
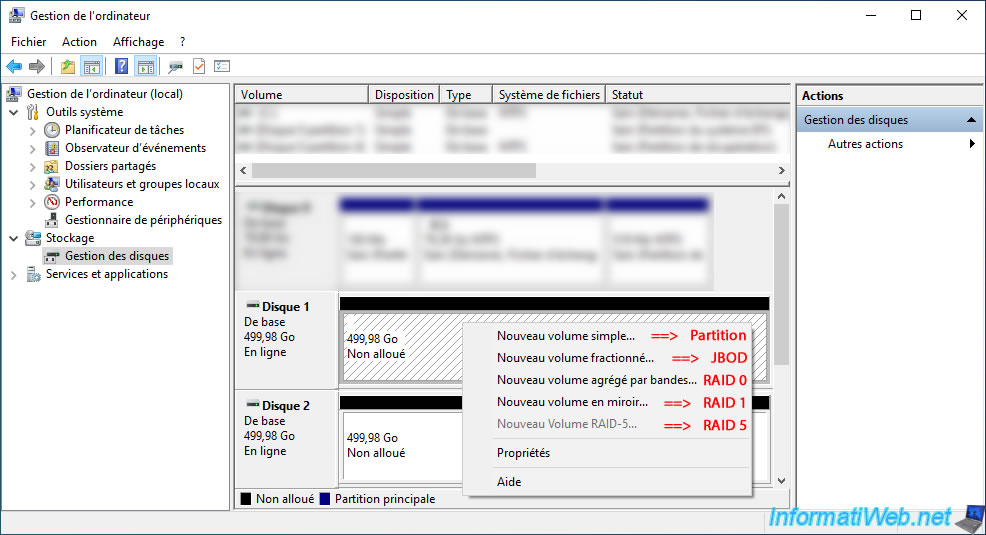
To use these new volume types (formerly called: partitions), open the file explorer and right-click "Manage" on "This PC" (or its equivalent: workstation, ...).
Note: on Windows 11, right-click "Show more options -> Manage" on "This PC".

In the "Computer Management" console that appears, go to the "Storage -> Disk Management" section (in the left column).
Then, right-click on the unallocated space of one of your blank disks and you will see that you can create different types of volumes on it:
- New Simple Volume: allows you to create primary partitions, then logical drives (logical disks) beyond 4 partitions.
To learn more, refer to our article "Why and how to partition a hard drive?", then to our tutorial "Windows Vista to 11 - Partitioning your hard drive" to create simple volumes on Windows. - New Spanned Volume: allows you to create a JBOD disk.
In other words, merge several physical disks into a single logical disk without any performance gain (unlike RAID 0 which increases performance).
However, if one of the physical disks fails, you will only lose the data that was on the failed disk. - New Striped Volume: allows you to create a logical disk in RAID 0 to increase the performance of your logical disk.
The size of this striped volume will be the sum of the sizes of the physical disks used.
However, if one of the physical disks that compose it fails, you will lose all the data on your striped volume.
Indeed, by using 2 disks, Windows will write half of each data on the 1st disk and the other half of each data on the 2nd disk. - New Mirrored Volume: allows you to create a logical disk in RAID 0 to increase only the security of your data.
The size of the mirrored volume created will be the size of the smallest physical disk used.
If a disk fails, you will not lose anything. However, this only protects you against the loss of a physical disk.
This will not prevent a virus or a file system error from corrupting data. - New RAID-5 Volume: in theory, RAID 5 provides a combination of security and performance.
However, the "New RAID-5 Volume" option is grayed out because it is not available on client versions of Windows.
You can only use this option on the server version of Windows (i.e. Windows Server).
2. What is the difference between a spanned volume (JBOD) and a striped volume (RAID 0)?
Important : although a spanned volume (JBOD) and a striped volume (RAID 0) can have the same size with the same physical disks and appear the same way in file explorer, these 2 types of volumes are quite different.
Indeed :
- a Spanned Volume (JBOD = Just a Bunch of Disks) allows you to merge multiple disks to obtain a larger logical volume, but does not provide any performance benefits.
However, if one of the physical disks fails, you only lose data for the failed physical disk concerned.
Indeed, with a spanned volume (JBOD), the disks remain independent, even if only one volume appears in the file explorer. - a striped volume (RAID 0) also allows you to use multiple disks to obtain a larger logical volume, but this one allows you to benefit from better performance.
However, in the event of a failure of one of the physical disks that compose it, you will lose all the data that was on this striped volume (RAID 0).
Indeed, with a striped volume (RAID 0) created on 2 physical disks, Windows writes half of each data on the 1st physical disk and the other half on the 2nd physical disk.
Therefore, if one of the physical disks fails, all your data will be corrupted and therefore lost.
Source : RAID Storage Solutions & RAID Arrays | Western Digital.
3. Spanned volume (software JBOD)
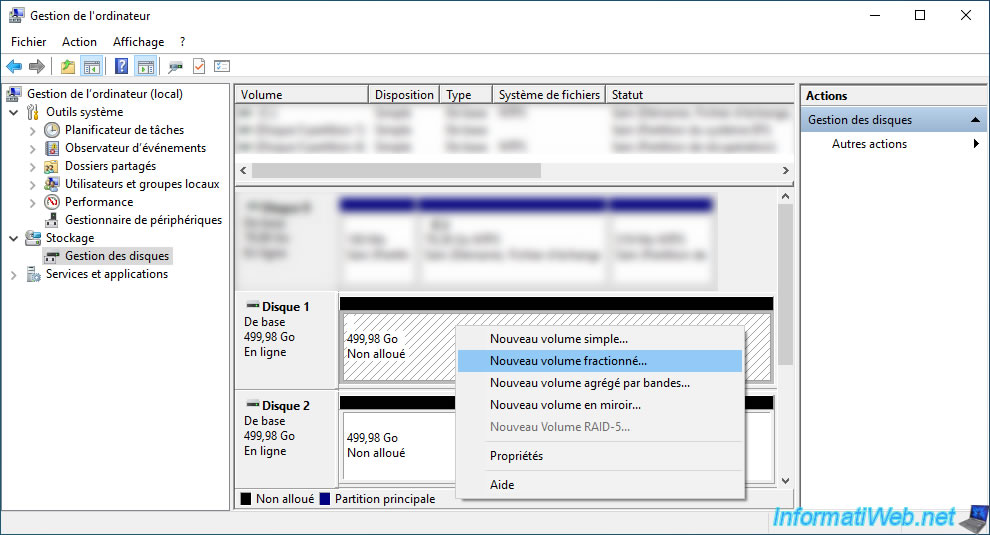
3.1. Create a spanned volume (JBOD) on Windows
If you want to create a volume that is larger than your physical disks, you can create a spanned volume.
This is equivalent to creating a JBOD logical disk if you were using a physical RAID controller that supports this type of disk.
To do this, right-click "New Spanned Volume" on the unallocated space of one of your physical disks.
Important : if one of the physical disks that you will use for this spanned volume (JBOD) fails, you will only lose the data on the physical disk concerned.
For more information, refer to the explanations given in step "2. What is the difference between a spanned volume (JBOD) and a striped volume (RAID 0)?" of this tutorial.
The "New Spanned Volume" wizard appears.
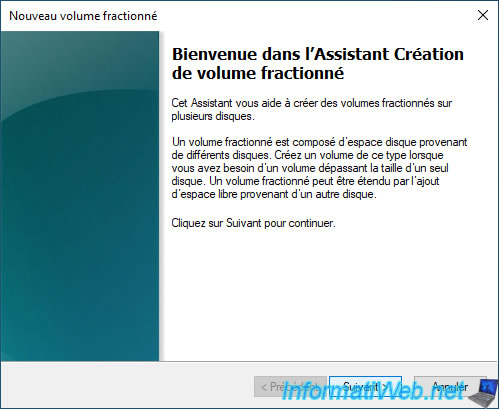
By default, the disk where you right-clicked "New Spanned Volume" is already in the right "Selected" list and the wizard will use all the available (unallocated) space on this disk.
In our case: Disk 1.
Now, select the disk you want to add and click "Add".
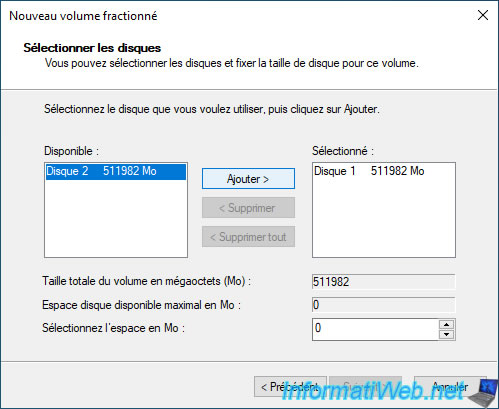
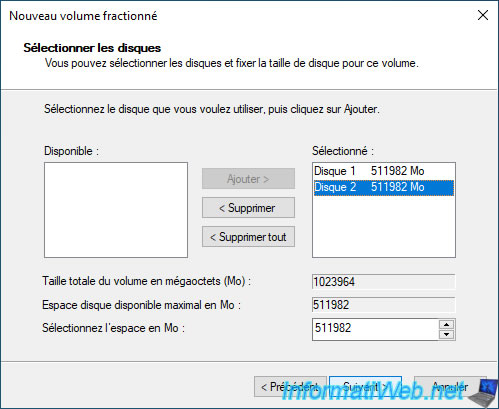
The desired disk (in our case: Disk 2) appears in the right list "Selected" and Windows uses, by default, all the space available on this disk.
If you want to use only a part of this added disk, then select the disk you just added on the right and modify the value displayed in the box "Select the space in MB".
Then, click on: Next.
Note: in our case, this split volume will be created on 2 physical disks of 500 GB each.
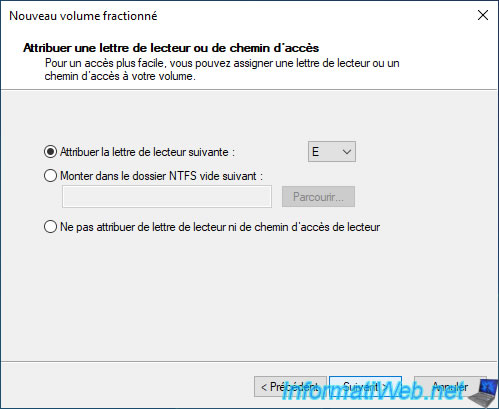
By default, Windows assigns the next available letter to this new spanned volume.
In our case: the letter "E".
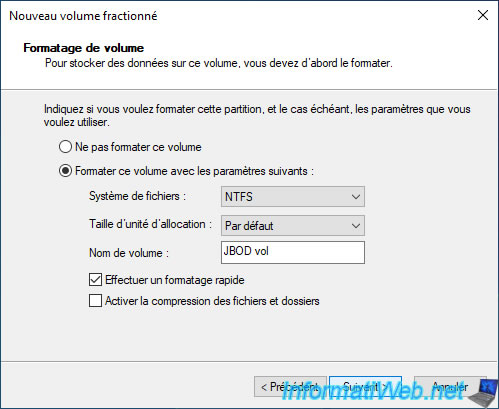
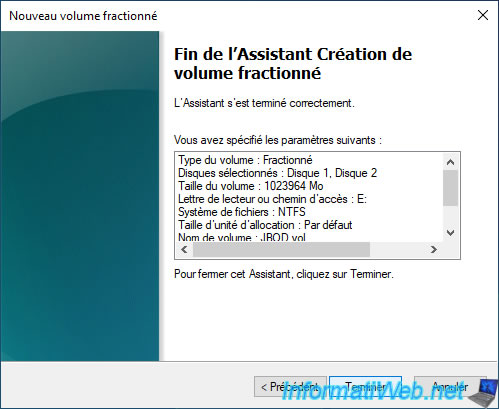
Enter the name you want it to appear under in File Explorer, check the box "Perform a quick format" to make the formatting much faster, and then click: Next.
Once the wizard is complete, click "Finish" to apply the changes.
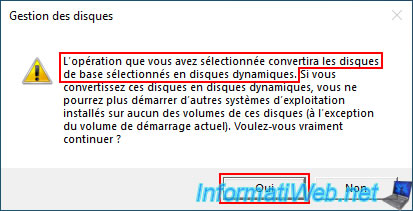
Warning : creating a spanned volume across multiple disks will convert your basic disks (default type) to dynamic disks.
Once the basic disk is converted to dynamic disk, you will no longer be able to boot your computer into an operating system that would be installed on one of these disks.
If this is not the case, then you can safely ignore this warning by clicking "Yes".
Plain Text
The operation you selected will convert the selected basic disk(s) to dynamic disk(s). If you convert the disk(s) to dynamic, you will not be able to start installed operating systems from any volumes on the disk(s) ...
Notes :
- you can quickly and easily convert a basic disk to a dynamic disk while preserving the volumes and therefore the data present on the disk concerned.
However, the reverse is not true. - converting a basic disk to a dynamic disk is not irreversible.
However, to convert a dynamic disk to a basic disk, you will first have to delete all volumes on the disk concerned before the option is available in Windows disk management.
The disks selected in the "New Spanned Volume" wizard have been converted to dynamic disks and a single spanned volume has been created on these disks.
As you can see, the spanned volumes appear in purple and the name of the created volume is the same on both disks.
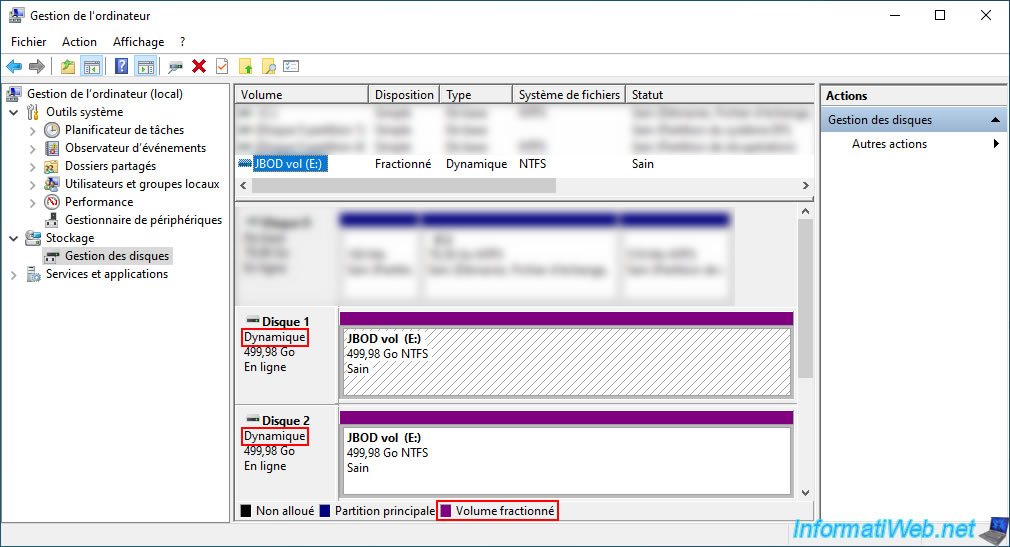
If you go to Windows file explorer, you will see a single volume appear, whose size corresponds to the sum of the sizes of the physical disks selected when creating this spanned volume (JBOD).
Note: in our case, using 2 physical disks of 500 GB each, the size of the spanned volume visible in file explorer is therefore 1 TB (= 1000 GB).
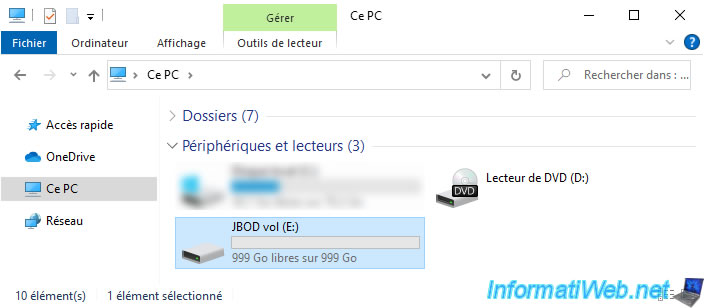
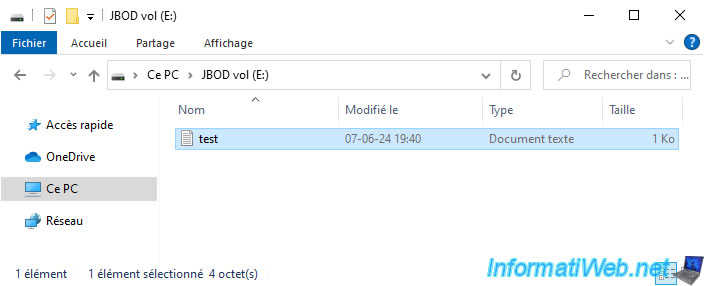
For data storage on Windows, nothing changes.
You can use this spanned volume as a simple partition.
3.2. Delete a spanned volume (JBOD) on Windows
To completely delete a spanned volume, simply right-click "Delete volume" on it (regardless of which disk it affects).
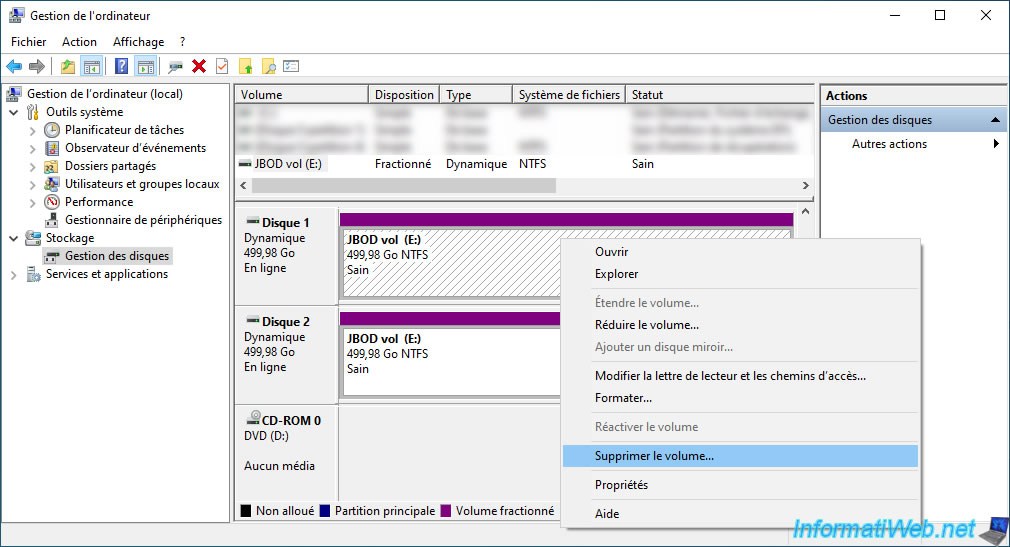
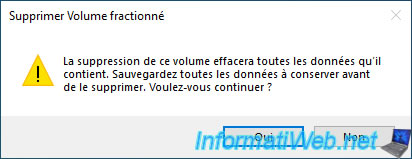
Click "Yes" to confirm the deletion of this spanned volume (on all physical disks that compose it) and the deletion of all data that was in this volume.
Plain Text
Delete spanned volume.
Deleting this volume will erase all data on it.
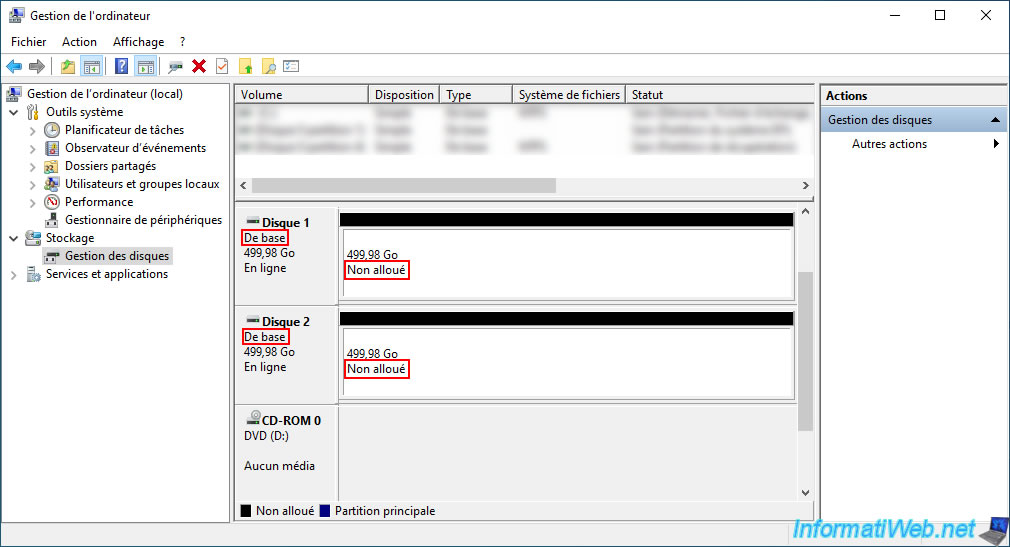
The spanned volume has been deleted and the freed space becomes unallocated space.
If the affected disks have become empty (because the spanned volume was taking up all the disk space on them), then Windows will convert these disks back to basic disks (the default type).
Share this tutorial
To see also
-

Windows 3/22/2022
Upgrade from Windows 10 to Windows 11 (not compatible hardware / official method)
-
Windows 10/2/2023
Upgrade Windows 11 to newer version of Win 11 (from DVD)
-
Windows 1/27/2025
Windows 10 - Disable window snapping suggestions
-
Windows 9/21/2021
Windows 8 / 8.1 / 10 / 11 - Switching from IDE to AHCI without reinstalling Windows
You must be logged in to post a comment