- Windows
- Windows 8 / 8.1, Windows 10, Windows 11
- 13 March 2025 at 14:36 UTC
-

- 1/8
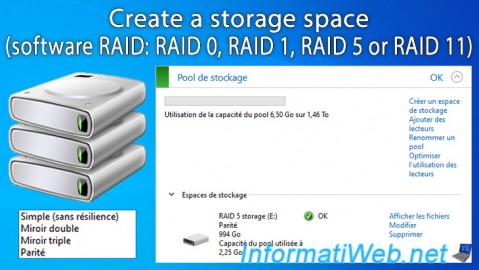
Since Windows 8, you can create Storage Spaces to create storage on multiple physical disks with better performance and/or fault tolerance.
This is equivalent to using a software RAID. The software RAID levels supported by Windows 8 to 11 are: RAID 0, RAID 1, RAID 5 and RAID 11.
Note: the main advantages of Storage Spaces on Windows are that:
- they allow you to create a software RAID 5.
Which is not possible from Windows Disk Management when you are using a client version of Windows.
Indeed, in Windows Disk Management, the "New RAID-5 Volume" option is always grayed out. Whereas with storage spaces, you can create a "parity" type storage space (which is the same as a software RAID 5). - they can be enlarged later by adding new physical disks if you start to run out of free space on them.
Warning : as with any other software RAID system, you will be tied to the system used and in this case also to its version.
In other words, a storage space created under Windows 10 can't work with previous versions of Windows.
On the other hand, a storage space created under Windows 10 can also work under Windows 11.
However, if you then upgrade your storage space under Windows 11, it will no longer work with Windows 10.
Tutorial made with Windows 10 version 2104 and also tested with Windows 11 v21H2, 8.1 Pro and 8.
Warning : the graphical interface for creating storage spaces under Windows 10 version 2004 can return an error "0x00000057" for no valid reason.
If you are in this case, refer to the last step of this tutorial to resolve the problem.
- Blank disks required
- Access storage spaces via the Windows 10 settings app
- Access storage spaces via Windows control panel
- Simple storage space (RAID 0 software)
- Two-way mirror storage space (software RAID 1)
- Three-way mirror storage space (software RAID 11)
- Parity storage space (software RAID 5)
- Create a parity storage space (RAID 5)
- Data preserved in case of physical disk failure with parity storage (RAID 5)
- Data lost if at least 2 physical disks fail with parity storage (RAID 5)
- Delete a parity storage space (RAID 5) and its storage pool
- 2 physical disk fault tolerance for 7 disks not functional with parity storage (RAID 5)
- Error 0x00000057 encountered with Windows 10 v2004 when creating a storage space
1. Blank disks required
To create storage spaces on your physical disks, your disks must be blank (empty).
To do this, you will need to use new hard drives or SSDs or delete all partitions on them.
1.1. Blank disks
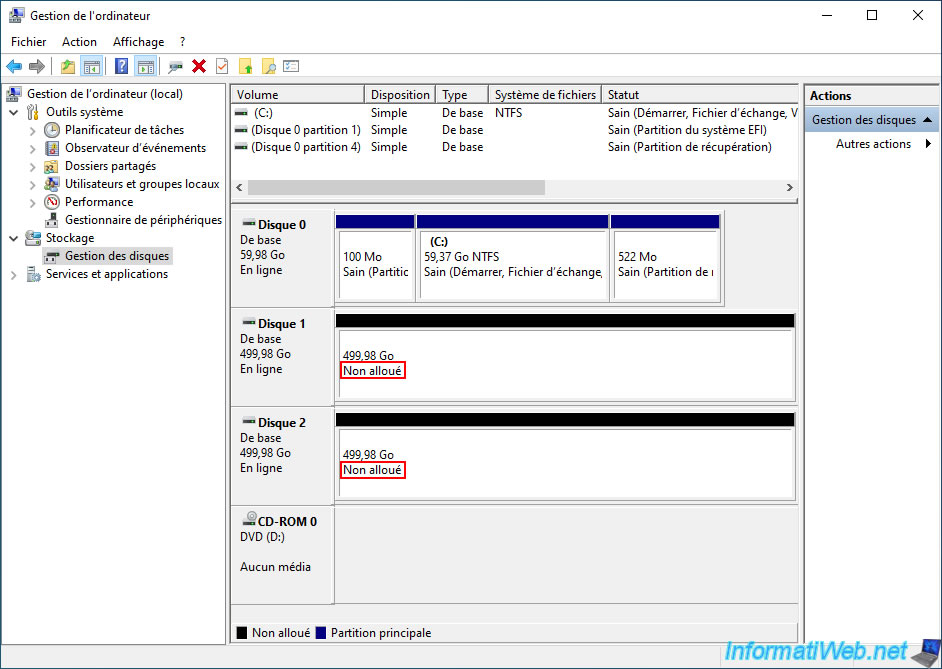
To see the contents of your physical disks, open file explorer, then right-click "Manage" on "This PC".
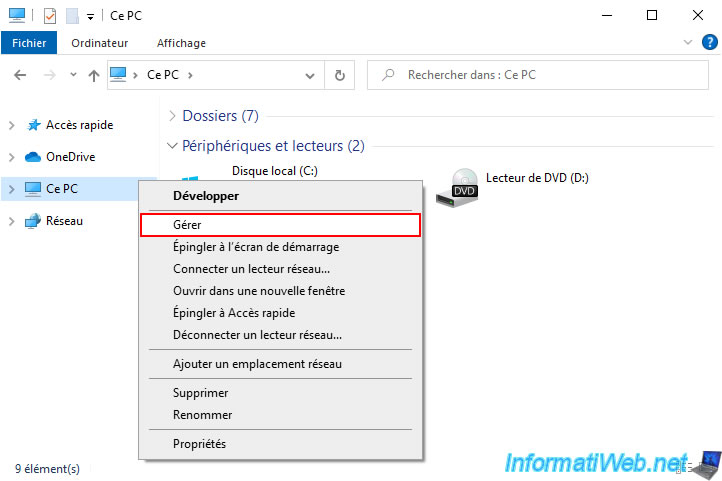
Next, go to the "Disk Management" section.
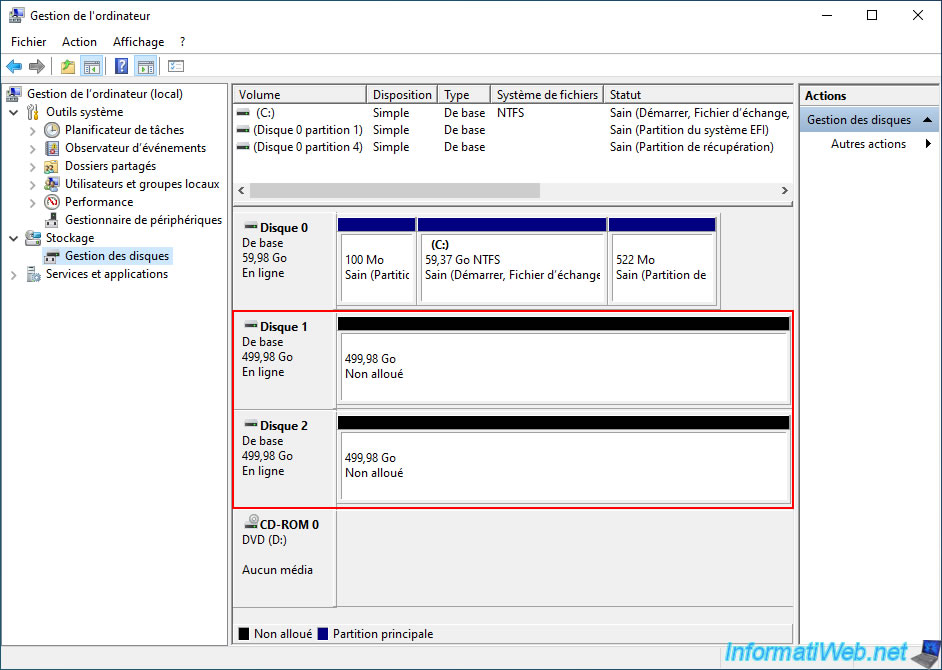
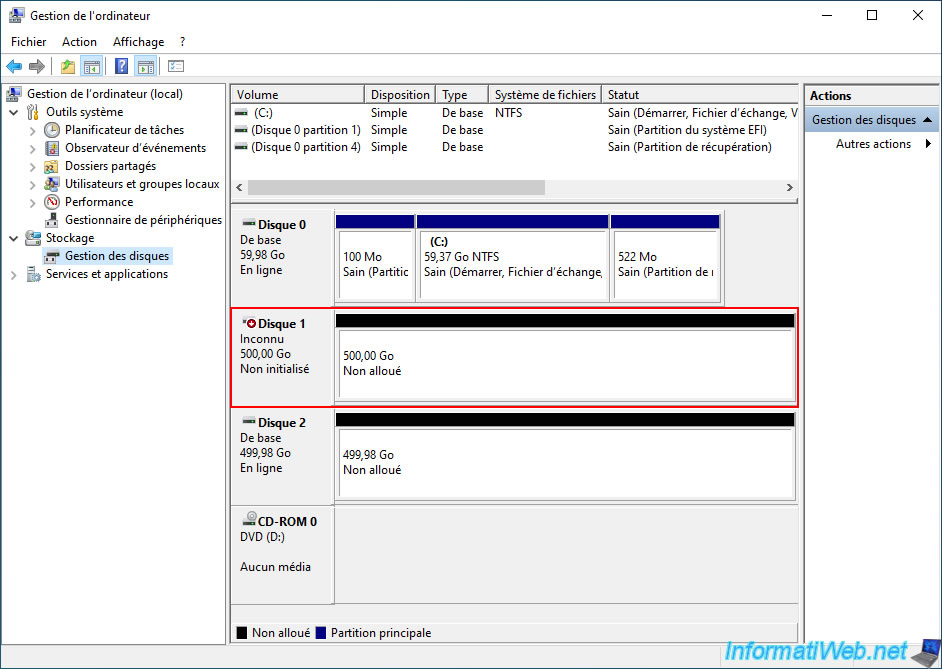
If you just bought your physical disks, you will see that they are "Uninitialized" and therefore there is only "Unallocated" space on them.
If you see this, you are good.

If you have already initialized your physical disks, but there is only "Unallocated" space on them, that's fine too.
1.2. Delete existing volumes (partitions)
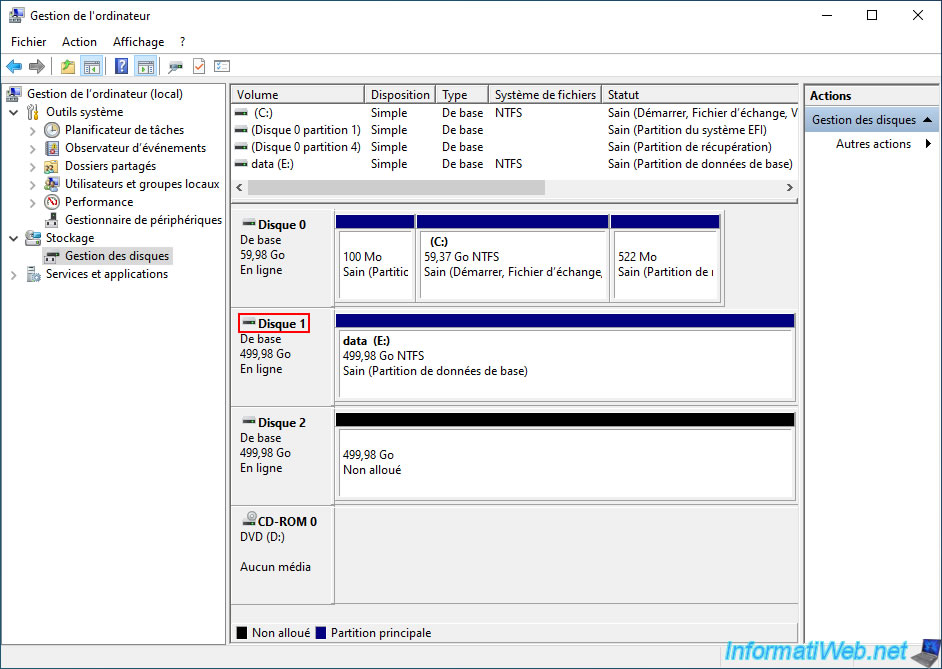
If you have already partitioned your physical disks in the past, you can recover these disks by deleting the volumes (partitions) on them.
To do this, right-click "Delete Volume" on each volume (partition) you want to delete.
Note: if the "Delete Volume" option is grayed out in your case (which can happen on a physical disk where an operating system (such as Windows or other) was installed), go to the next step of this tutorial.
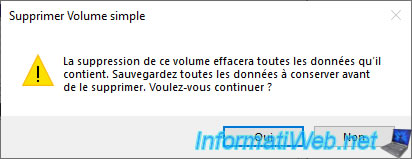
Warning : deleting a volume will permanently delete all data on it.
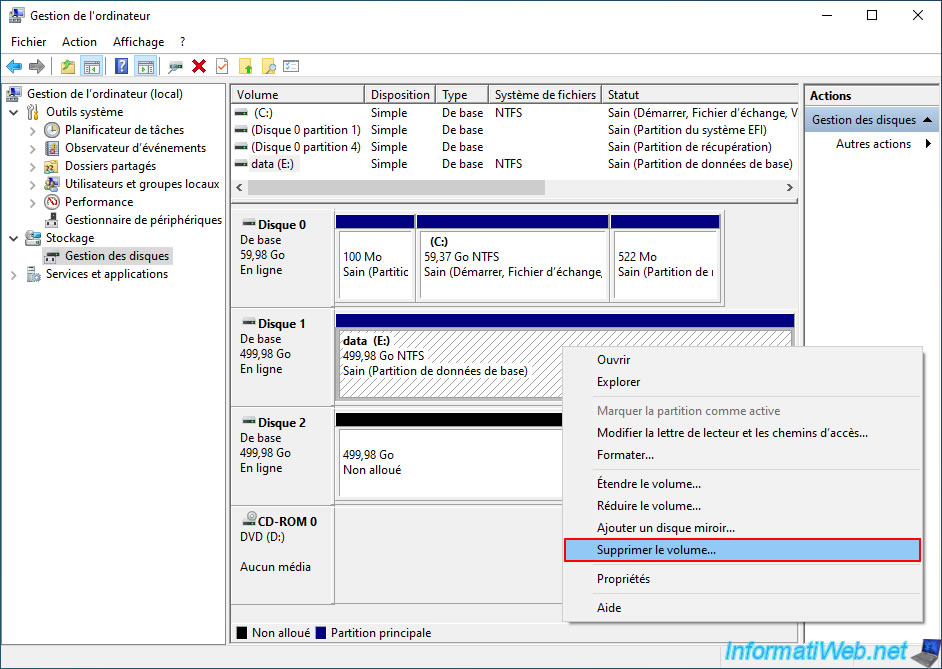
Confirm the deletion of this volume, as well as the deletion of the data on it, by clicking "Yes".
Now, only unallocated space remains on the desired physical disks.
1.3. Quickly erase a physical disk
In some cases, the "Delete Volume" option may be grayed out when you try to delete a volume from a physical disk.
This is particularly the case with system partitions created during the installation of an operating system (including Windows).
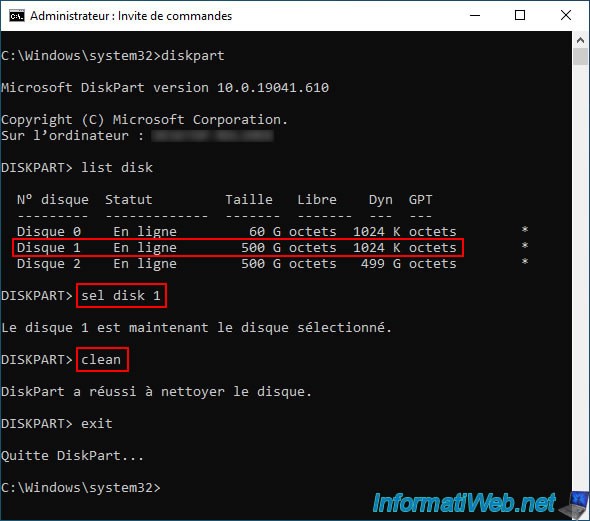
In this case, locate the desired physical disk number here (in Windows Disk Management).
Launch a command prompt (cmd.exe) and run the command line utility "diskpart". The prefix "DISKPART>" appears.
Batch
diskpart
Plain Text
DISKPART>
List the physical disks available in your case.
Batch
list disk
In our case, we can see that our disk 1 is indeed partitioned since its size is 500G and the available free space is 1024KB (in other words, almost nothing).
Plain Text
Disk 1 Online 500 GB 1024 KB *
Select the desired physical disk (whose number displayed by DiskPart corresponds to the same number in Windows Disk Management).
In our case, we select disk 1.
Batch
sel disk 1
Diskpart tells you that the desired disk has been selected.
Which means that the commands you type after that will be executed on that disk.
Plain Text
Disk 1 is now the selected disk.
Completely erase the selected physical disk by typing the command below.
Batch
clean
The message below appears.
Plain Text
DiskPart succeeded in cleaning the disk.
Exit DiskPart by typing the command below, then close the command prompt.
Batch
exit
The disk you just erased via DiskPart will appear with the status "Not initialized" and only unallocated space.
Which is enough to be able to use it with a storage space on Windows.
2. Access storage spaces via the Windows 10 settings app
The 1st possibility (available only on Windows 10) to create a storage space is to open the Windows 10 start menu and click on: Settings.
Note: if you are using another version of Windows, refer to the next step of this tutorial to access it from the Windows control panel.
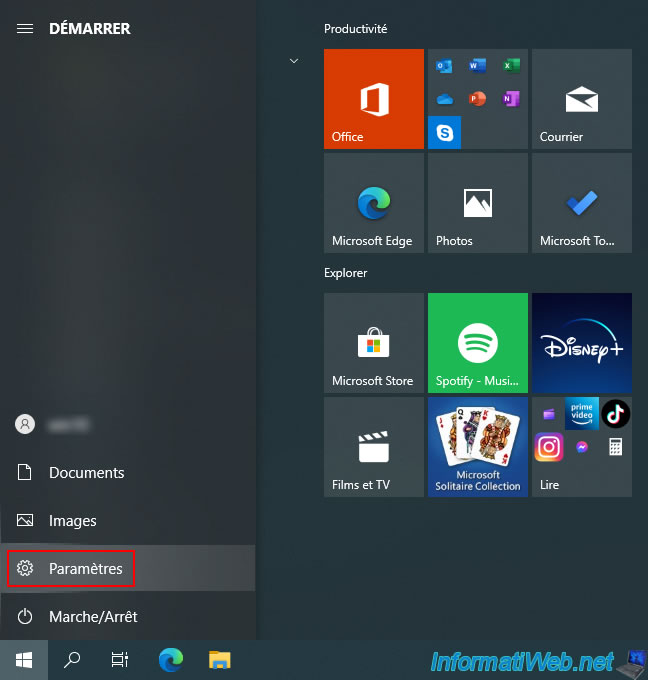
In the "Settings" application that appears, click on "System".

In the left column, click on "Storage".
Then, in the right part, click on the "Manage Storage Spaces" link located at the bottom.
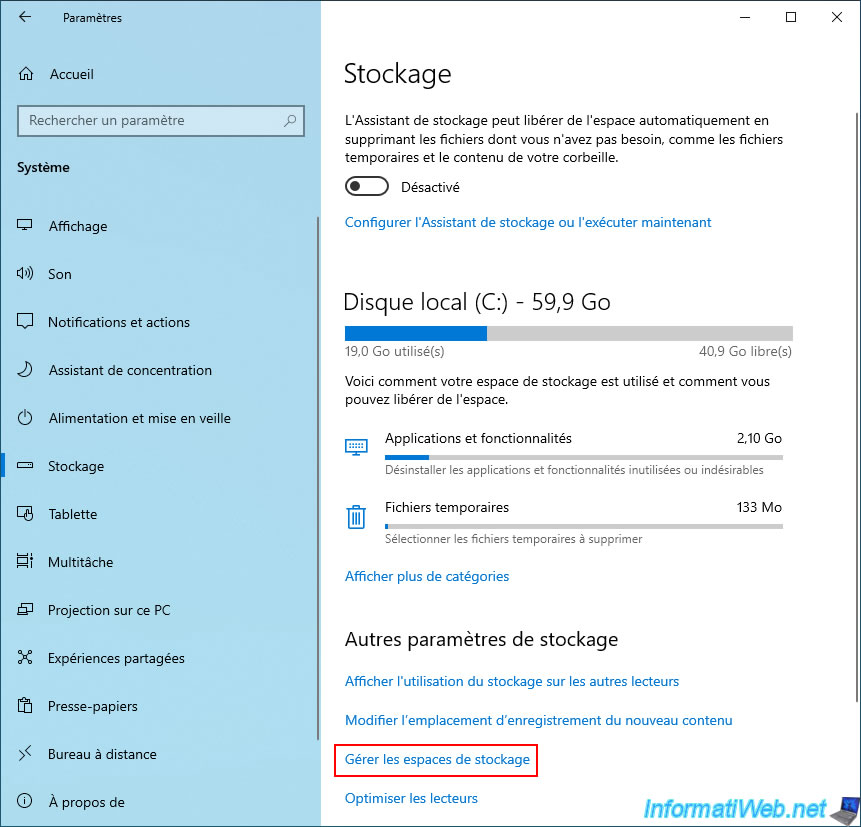
The "Storage Spaces" window will appear.
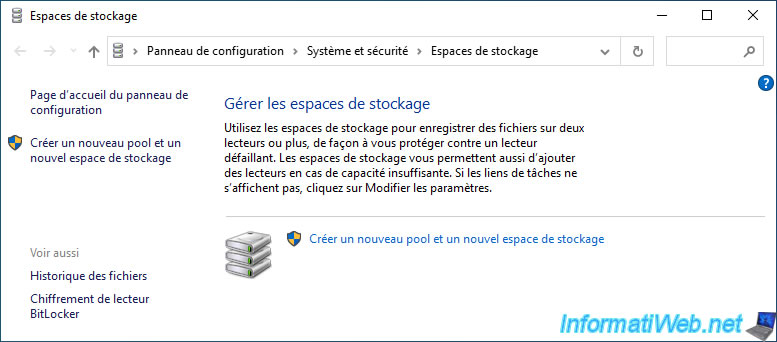
3. Access storage spaces via Windows control panel
The 2nd possibility to create storage spaces under Windows is to use the control panel.
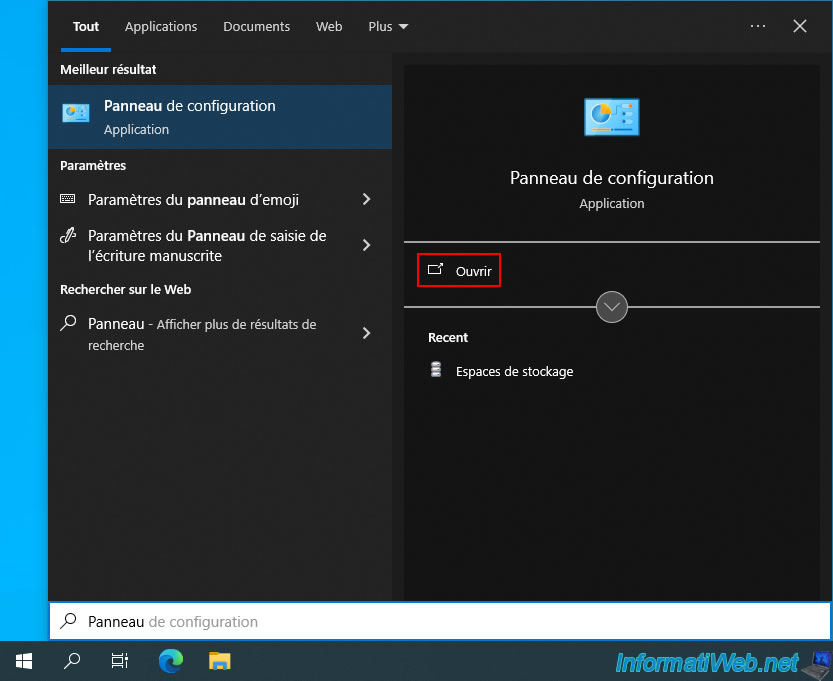
To do this, open the start menu, type "Panel" and launch the proposed "Control Panel".
In the control panel that appears, go to the "System and Security" section.
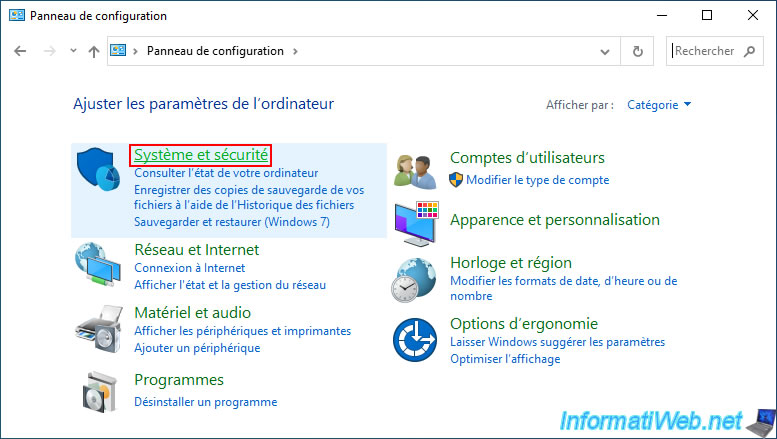
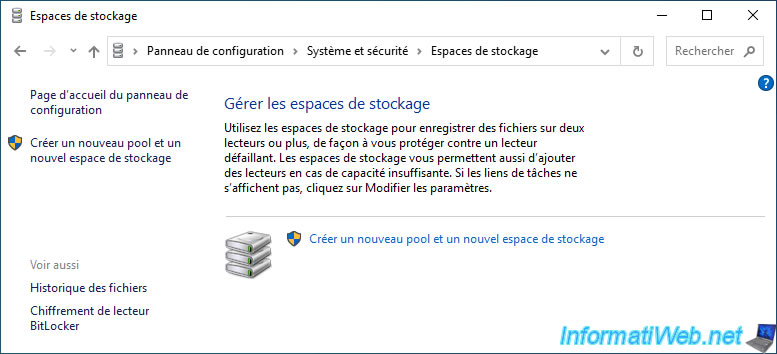
In this "System and Security" section, click on "Storage Spaces".

The same "Storage Spaces" window appears.
Share this tutorial
To see also
-
Windows 2/5/2021
Manage network cards priority on Windows
-

Windows 1/28/2017
Speed up your computer (ReadyBoost)
-
MultiBoot 6/3/2024
VHD/VHDX multiboot with Windows 7 and Windows 8.1
-
Windows 5/10/2021
Windows 8 / 8.1 / 10 / 11 - Installation on an USB support
You must be logged in to post a comment